Hugging Face 示範以機器學習篩選不滿意客户訊息
Supercharged Customer Service with Machine Learning
文章示範以 amazon_reviews_multi 的英文資料微調 microsoft/deberta-v3-base,建立五類情感分類模型以篩選最不滿意的客户訊息。測試中,模型識別出約 95% 的極度不滿意訊息,並把約 12% 的中立或滿意訊息誤判為需要回覆。按每日 10,000 則訊息的假設估算,人工工作量可減少約 83%;文章指出,實際應用需要貼近業務情境的高質素訓練數據。
文章由任務界定、資料集篩選延伸至微調與業務指標設計,展示如何把模型評估對準客服實際處理目標。

本文會模擬真實客戶服務情境,並運用 Hugging Face 生態系統中的機器學習工具來處理。
我們強烈建議將此 notebook 作為範本/示例,解決你的實際問題。
界定任務、資料集與模型
開始編寫程式碼之前,先清楚界定你希望自動化或部分自動化的使用情境非常重要。 清楚界定使用情境,有助找出最合適的任務、資料集和模型。
界定 NLP 任務
好,現在探討一個假設問題,看看如何使用自然語言處理模型解決。假設我們正在銷售產品,客戶支援團隊每天收到數以千計的訊息,包括意見、投訴和問題,理想情況下都應該逐一回覆。
很快便會發現,客戶支援團隊根本無法回覆每則訊息。因此,我們決定只回覆最不滿的客戶,並目標是回覆其中 100% 的訊息,因為這些訊息可能比中性或正面意見更急需處理。
假設 a) 極度不滿客戶的訊息只佔所有訊息一小部分,而且 b) 我們可以自動篩選出不滿訊息,客戶支援團隊便應能達成這個目標。
為了自動篩選不滿訊息,我們計劃採用自然語言處理技術。
第一步是將使用情境,也就是篩選不滿訊息,對應至一項機器學習任務。
Hugging Face Hub 的任務頁面是很好的起點,可用來查看哪項任務最符合特定情境。每項任務都有詳細説明和可能的使用情境。
找出最不滿客戶的訊息,可建模為文本分類任務:將訊息分類至以下 5 個類別之一:非常不滿、不滿、中性、滿意,或非常滿意。
尋找合適的資料集
確定任務後,下一步是尋找用來訓練模型的資料。與挑選正確的模型架構相比,這通常對使用情境的效能更重要。 請記住,模型的品質只會與其訓練資料一樣好。因此,整理和/或選擇資料集時應格外謹慎。
既然我們考慮的假設情境是篩選不滿訊息,就來看看有哪些資料集可用。
在真實情境中,你很可能擁有最能代表 NLP 系統實際處理內容的內部資料。因此,應使用這些內部資料訓練 NLP 系統。 不過,加入公開資料亦有助提升模型的泛化能力。
來看看 Hugging Face Hub 上有哪些資料集。左側可按任務類別及更具體的任務篩選資料集。我們的使用情境對應文本分類 -> 情感分析,因此選擇這些篩選條件。撰寫此 notebook 時,篩選結果約有 80 個資料集。挑選資料集時應評估兩個方面:
- 品質:資料集品質高嗎?更具體來説,資料是否符合使用情境中預期處理的內容?資料是否多元、無偏見等?
- 規模:資料集有多大?一般而言,資料集越大越好。
要有效評估資料集品質並不容易,更難判斷資料是否有偏,以及偏見的程度。 一個有效而合理的品質指標,是查看下載統計。下載次數越多,使用量越高,資料集品質較高的可能性亦越大。至於規模,通常很容易直接查看。現在看看下載量最高的資料集:
現在可閲讀資料集卡,進一步檢視資料集,理想情況下卡片會提供所有相關重要資訊。此外,資料集檢視器是非常強大的工具,可用來檢查資料是否符合使用情境。
快速看看以上資料集的説明卡:
- GLUE 是一組小型資料集,主要供研究人員比較新模型架構。這些資料集太小,且與我們的使用情境不夠相符。
- Amazon polarity 是大型且適合客戶意見分析的資料集,因為內容是客戶評論。不過,它只有二元標籤(正面/負面),而我們需要更細緻的情感分類。
- Tweet eval 使用不同 emoji 作標籤,不容易映射到從不滿至滿意的量表。
- Amazon reviews multi 看來最適合此處。它有 1-5 的情感標籤,對應 Amazon 的 1-5 星,可映射為非常不滿、中性、滿意、非常滿意。我們在資料集檢視器抽查了一些例子,確認評論與實際客戶意見相似,因此這個資料集非常合適。此外,每則評論都有
product_category標籤,所以我們甚至可以只使用與所屬業務產品類別相符的評論。資料集支援多種語言,但目前只關注英文版本。 - Yelp review full 看來也非常合適。它規模大,包含產品評論及 1 至 5 的情感標籤。可惜這裡的資料集檢視器無法使用,資料集卡片亦相對簡略,因此需要更多時間檢查。此時應閲讀相關論文,但考慮到本文篇幅與時間限制,我們選擇使用 Amazon reviews multi。 總結來説,讓我們使用Amazon reviews multi資料集,並納入所有訓練樣本。
最後補充,即使使用私人資料集,我們仍建議善用 Hub 的資料集功能。Hugging Face Hub、Transformers 和 Datasets 整合得非常完善,搭配使用十分簡單。
此外,Hugging Face Hub 還提供:
尋找合適的模型
確定最能描述使用情境的任務和資料集後,現在可以挑選合適的模型。
你很可能需要為自己的使用情境微調預訓練模型,但值得先查看 Hub 上有沒有合適的微調模型。在這種情況下,直接用自己的資料集繼續微調該模型,可能取得更佳效能。
看看有哪些模型以 Amazon Reviews Multi 微調。右下角有模型清單,點選瀏覽以此資料集訓練的模型,即可查看所有公開的該資料集微調模型。請注意,我們只關注資料集的英文版本,因為客戶意見只會使用英文。下載量最高的模型大多以多語言版本訓練;其餘看來並非多語言的模型,資訊很少或效能欠佳。此時直接微調純預訓練模型,或許比採用上述已微調模型更合理。
接下來要尋找適合微調的預訓練模型。這比想像中困難,因為 Hugging Face Hub 上預訓練和微調模型數量龐大。通常最好的做法是直接試用多個模型,找出表現最佳者。 目前我們尚未找到在 Hugging Face 比較不同模型檢查點的完美方法,但以下有些值得參考的資源:
不過,上述兩項資源目前都不夠理想。作者未必會定期更新模型摘要。新模型架構推出、舊架構過時的速度很快,要維持涵蓋所有架構的最新摘要極為困難。
同樣地,下載量最高的模型檢查點未必就是表現最佳者。例如,bert-base-cased是下載量最高的檢查點之一,但已不是表現最好的檢查點。
最佳做法是試用不同模型架構、追蹤領域專家以瞭解新架構,並查看知名排行榜。
文本分類方面,值得參考的基準測試包括 GLUE 和 SuperGLUE。兩者會以多種文本分類任務評估預訓練模型,例如語法正確性、自然語言推理、是非題問答等,這些任務與我們的情感分析目標相近。因此,選擇這些基準測試中排名領先的模型用於此任務是合理的。
撰寫本文時,表現最好的模型都是包含超過 10 billion 個參數的大型模型,而且大多沒有開放原始碼,例如 ST-MoE-32B、Turing NLR v5 或 ERNIE 3.0。其中一款容易取得的頂尖模型是 DeBERTa。因此,我們試用 DeBERTa 最新的 base 版本,即 亦即 microsoft/deberta-v3-base。
使用 🤗 Transformers 和 🤗 Datasets 訓練/微調模型
本節會介紹如何端到端微調模型,從而自動篩選出極度不滿客戶的意見訊息。
好!先安裝所需的 pip 套件並設定程式環境,然後預處理資料集,最後開始訓練模型。
以下 notebook 可在啟用 GPU 執行環境的 Google Colab Pro 線上執行。
安裝所有必要套件
首先,安裝 git-lfs,以便在訓練期間自動將模型檢查點上載至 Hub。
apt install git-lfs
我們亦會安裝 🤗 Transformers 和 🤗 Datasets 程式庫以執行此 notebook。由於本文會使用 DeBERTa,還需要安裝其 tokenizer 所需的 sentencepiece 程式庫。
pip install datasets transformers[sentencepiece]
接着登入你的 Hugging Face 帳戶,以確保模型會以你的帳戶名稱上載。
from huggingface_hub import notebook_login

notebook_login()
輸出:
    Login successful
    Your token has been saved to /root/.huggingface/token
    Authenticated through git-credential store but this isn't the helper defined on your machine.
    You might have to re-authenticate when pushing to the Hugging Face Hub. Run the following command in your terminal in case you want to set this credential helper as the default

    git config --global credential.helper store
預處理資料集
開始訓練模型之前,要先將資料集轉換成模型能理解的格式。
幸好,🤗 Datasets 程式庫讓這件事變得非常簡單,以下單元會展示做法。
load_dataset 函式會載入資料集,並整理至 review_body、stars 等預先定義的屬性,最後以 arrow 格式將整理好的資料儲存至磁碟。
Arrow 格式可讓資料讀寫快速且節省記憶體。
現在載入並準備英文版 amazon_reviews_multi 資料集。
from datasets import load_dataset

amazon_review = load_dataset("amazon_reviews_multi", "en")
輸出:
    Downloading and preparing dataset amazon_reviews_multi/en (download: 82.11 MiB, generated: 58.69 MiB, post-processed: Unknown size, total: 140.79 MiB) to /root/.cache/huggingface/datasets/amazon_reviews_multi/en/1.0.0/724e94f4b0c6c405ce7e476a6c5ef4f87db30799ad49f765094cf9770e0f7609...

    Dataset amazon_reviews_multi downloaded and prepared to /root/.cache/huggingface/datasets/amazon_reviews_multi/en/1.0.0/724e94f4b0c6c405ce7e476a6c5ef4f87db30799ad49f765094cf9770e0f7609. Subsequent calls will reuse this data.
很好,速度很快 🔥。現在看看資料集的結構。
print(amazon_review)
輸出:
{.output .execute_result execution_count="5"}
    DatasetDict({
        train: Dataset({
            features: ['review_id', 'product_id', 'reviewer_id', 'stars', 'review_body', 'review_title', 'language', 'product_category'],
            num_rows: 200000
        })
        validation: Dataset({
            features: ['review_id', 'product_id', 'reviewer_id', 'stars', 'review_body', 'review_title', 'language', 'product_category'],
            num_rows: 5000
        })
        test: Dataset({
            features: ['review_id', 'product_id', 'reviewer_id', 'stars', 'review_body', 'review_title', 'language', 'product_category'],
            num_rows: 5000
        })
    })
資料集有 200,000 個訓練樣本,以及 5000 個驗證和測試樣本,作為訓練資料相當合理!我們真正關注的輸入是 "review_body" 欄位,目標則是 "starts" 欄位。
隨機查看一個例子。
random_id = 34

print("Stars:", amazon_review["train"][random_id]["stars"])
print("Review:", amazon_review["train"][random_id]["review_body"])
輸出:
    Stars: 1
    Review: This product caused severe burning of my skin. I have used other brands with no problems
資料集目前是人類可讀的格式,但現在需要轉換成「機器可讀」格式。先定義模型儲存庫,當中包含預處理和微調所選檢查點所需的工具。
model_repository = "microsoft/deberta-v3-base"
接着載入模型儲存庫的 tokenizer,即 DeBERTa 的 Tokenizer。
from transformers import AutoTokenizer

tokenizer = AutoTokenizer.from_pretrained(model_repository)
如前所述,我們會以 "review_body" 作模型輸入,並以 "stars" 作目標。接着使用 tokenizer 將輸入轉換成模型可理解的 token ID 序列。Tokenizer 正是負責這項工作,也可限制輸入長度,避免記憶體不足。此處將最大長度設為 128 個 token;以 DeBERTa 而言,約相當於 100 個字,亦即約 5-7 句。再次查看資料集檢視器,可見這已涵蓋幾乎所有訓練樣本。
重要:這不代表模型無法處理更長輸入,只是訓練時採用 128 的最大長度,因為它涵蓋 99% 的訓練資料,而且我們不想浪費記憶體。Transformer 模型在訓練後,通常能很好地泛化至較長序列。
如想進一步瞭解 tokenization,請參閲Tokenizers 文件。
標籤很容易轉換,因為原始格式已是數字,即 1 至 5。此處只要將標籤平移至 0 至 4,因為索引通常從 0 開始。
好,現在動手寫程式碼。我們會定義一個 preprocess_function,並套用至每個資料樣本。
def preprocess_function(example):
    output_dict = tokenizer(example["review_body"], max_length=128, truncation=True)
    output_dict["labels"] = [e - 1 for e in example["stars"]]
    return output_dict
要將此函式套用至資料集的所有樣本,我們使用稍早建立的 map 方法,處理 amazon_review 物件。這會將函式套用至 amazon_review 中所有分割的所有元素,因此只需一個指令便能預處理訓練、驗證和測試資料。我們以 batched=True 模式執行映射函式,以加快處理,並移除所有訓練不再需要的欄位。
tokenized_datasets = amazon_review.map(preprocess_function, batched=True, remove_columns=amazon_review["train"].column_names)
現在看看新的資料結構。
tokenized_datasets
輸出:
    DatasetDict({
        train: Dataset({
            features: ['input_ids', 'token_type_ids', 'attention_mask', 'labels'],
            num_rows: 200000
        })
        validation: Dataset({
            features: ['input_ids', 'token_type_ids', 'attention_mask', 'labels'],
            num_rows: 5000
        })
        test: Dataset({
            features: ['input_ids', 'token_type_ids', 'attention_mask', 'labels'],
            num_rows: 5000
        })
    })
可以看到,資料結構的外層維持不變,但欄位名稱已改變。 現在再看剛才那個隨機樣本,這次查看預處理後的版本。
print("Input IDS:", tokenized_datasets["train"][random_id]["input_ids"])
print("Labels:", tokenized_datasets["train"][random_id]["labels"])
輸出:
    Input IDS: [1, 329, 714, 2044, 3567, 5127, 265, 312, 1158, 260, 273, 286, 427, 340, 3006, 275, 363, 947, 2]
    Labels: 0
好,輸入文字已轉換成整數序列,模型可將其轉換為詞嵌入;標籤索引則只是減去 1。
微調模型
完成資料預處理後,接着微調模型。我們會使用熱門的 Hugging Face Trainer,只需幾行程式碼便可開始訓練。Trainer 幾乎適用於所有 PyTorch 任務,而且十分方便,可代勞大量訓練所需的樣板程式碼。
先使用方便的 AutoModelForSequenceClassification 載入模型檢查點。由於模型儲存庫的檢查點只是預訓練檢查點,我們應傳入 num_lables=5 定義分類頭的大小(因為有 5 個情感類別)。
from transformers import AutoModelForSequenceClassification

model = AutoModelForSequenceClassification.from_pretrained(model_repository, num_labels=5)
    Some weights of the model checkpoint at microsoft/deberta-v3-base were not used when initializing DebertaV2ForSequenceClassification: ['mask_predictions.classifier.bias', 'mask_predictions.LayerNorm.bias', 'mask_predictions.dense.weight', 'mask_predictions.dense.bias', 'mask_predictions.LayerNorm.weight', 'lm_predictions.lm_head.dense.bias', 'lm_predictions.lm_head.bias', 'lm_predictions.lm_head.LayerNorm.weight', 'lm_predictions.lm_head.dense.weight', 'lm_predictions.lm_head.LayerNorm.bias', 'mask_predictions.classifier.weight']
    - This IS expected if you are initializing DebertaV2ForSequenceClassification from the checkpoint of a model trained on another task or with another architecture (e.g. initializing a BertForSequenceClassification model from a BertForPreTraining model).
    - This IS NOT expected if you are initializing DebertaV2ForSequenceClassification from the checkpoint of a model that you expect to be exactly identical (initializing a BertForSequenceClassification model from a BertForSequenceClassification model).
    Some weights of DebertaV2ForSequenceClassification were not initialized from the model checkpoint at microsoft/deberta-v3-base and are newly initialized: ['pooler.dense.bias', 'classifier.weight', 'classifier.bias', 'pooler.dense.weight']
    You should probably TRAIN this model on a down-stream task to be able to use it for predictions and inference.
接着載入資料整理器。訓練時,資料整理器負責確保每個批次正確填充;由於每個 epoch 開始前會重新排列訓練樣本,因此應動態填充。
from transformers import DataCollatorWithPadding

data_collator = DataCollatorWithPadding(tokenizer=tokenizer)
訓練期間,監察模型在保留驗證集上的效能十分重要。為此,要定義 compute_metrics 函式並傳給 Trainer;訓練期間每次驗證時都會呼叫此函式。
文本分類最簡單的指標是準確率,表示正確分類的訓練樣本百分比。不過,如果驗證或測試資料非常不平衡,使用準確率可能會有問題。我們先快速統計各標籤的出現次數,確認情況並非如此。
from collections import Counter

print("Validation:", Counter(tokenized_datasets["validation"]["labels"]))
print("Test:", Counter(tokenized_datasets["test"]["labels"]))
輸出:
    Validation: Counter({0: 1000, 1: 1000, 2: 1000, 3: 1000, 4: 1000})
    Test: Counter({0: 1000, 1: 1000, 2: 1000, 3: 1000, 4: 1000})
驗證和測試資料集的分佈已盡可能平衡,因此可放心使用準確率!
現在透過 datasets 程式庫載入準確率指標。
from datasets import load_metric

accuracy = load_metric("accuracy")
接着定義 compute_metrics,它會套用至模型預測輸出;輸出類型為 EvalPrediction,因此包含模型預測和正確標籤。
我們對模型預測取 argmax 得出預測類別,再將結果連同正確標籤交給準確率指標計算。
import numpy as np

def compute_metrics(pred):
    pred_logits = pred.predictions
    pred_classes = np.argmax(pred_logits, axis=-1)
    labels = np.asarray(pred.label_ids)

    acc = accuracy.compute(predictions=pred_classes, references=labels)

    return {"accuracy": acc["accuracy"]}
很好,訓練所需組件都已備妥,現在只需定義 Trainer 的超參數。要確保訓練期間模型檢查點會上載至 Hugging Face Hub。設定 push_to_hub=True 後,每到 save_steps 就會透過方便的 push_to_hub 方法自動上載。
此外,還要定義學習率、預熱步數和訓練 epoch 等常見超參數。我們每 500 步記錄一次損失,每 5000 步評估一次。
from transformers import TrainingArguments

training_args = TrainingArguments(
    output_dir="deberta_amazon_reviews_v1",
    num_train_epochs=2,
    learning_rate=2e-5,
    warmup_steps=200,
    logging_steps=500,
    save_steps=5000,
    eval_steps=5000,
    push_to_hub=True,
    evaluation_strategy="steps",
)
把所有內容組合起來,傳入所需組件並建立 Trainer。訓練期間會以 "validation" 分割作為保留資料集。
from transformers import Trainer

trainer = Trainer(
    args=training_args,
    compute_metrics=compute_metrics,
    model=model,
    tokenizer=tokenizer,
    data_collator=data_collator,
    train_dataset=tokenized_datasets["train"],
    eval_dataset=tokenized_datasets["validation"]
)
Trainer 已準備就緒 🚀 呼叫 trainer.train() 即可開始訓練。
train_metrics = trainer.train().metrics
trainer.save_metrics("train", train_metrics)
輸出:
    ***** Running training *****
      Num examples = 200000
      Num Epochs = 2
      Instantaneous batch size per device = 8
      Total train batch size (w. parallel, distributed & accumulation) = 8
      Gradient Accumulation steps = 1
      Total optimization steps = 50000
輸出:
| 步數 | 訓練損失 | 驗證損失 | 準確率 |
| 5000 | 0.931200 | 0.979602 | 0.585600 |
| 10000 | 0.931600 | 0.933607 | 0.597400 |
| 15000 | 0.907600 | 0.917062 | 0.602600 |
| 20000 | 0.902400 | 0.919414 | 0.604600 |
| 25000 | 0.879400 | 0.910928 | 0.608400 |
| 30000 | 0.806700 | 0.933923 | 0.609200 |
| 35000 | 0.826800 | 0.907260 | 0.616200 |
| 40000 | 0.820500 | 0.904160 | 0.615800 |
| 45000 | 0.795000 | 0.918947 | 0.616800 |
| 50000 | 0.783600 | 0.907572 | 0.618400 |
輸出:
    ***** Running Evaluation *****
      Num examples = 5000
      Batch size = 8
    Saving model checkpoint to deberta_amazon_reviews_v1/checkpoint-50000
    Configuration saved in deberta_amazon_reviews_v1/checkpoint-50000/config.json
    Model weights saved in deberta_amazon_reviews_v1/checkpoint-50000/pytorch_model.bin
    tokenizer config file saved in deberta_amazon_reviews_v1/checkpoint-50000/tokenizer_config.json
    Special tokens file saved in deberta_amazon_reviews_v1/checkpoint-50000/special_tokens_map.json
    added tokens file saved in deberta_amazon_reviews_v1/checkpoint-50000/added_tokens.json


    Training completed. Do not forget to share your model on huggingface.co/models =)
不錯,模型似乎學到了一些東西!訓練和驗證損失都在下降,準確率亦遠高於隨機猜測(20%)。有趣的是,只需 5000 步,準確率便達到約 58.6 %,之後提升不大。換用更大型模型或延長訓練時間,效果或許會更好,但對這個假設情境來説已經足夠!
好,最後將模型檢查點上載至 Hub。
trainer.push_to_hub()
輸出:
    Saving model checkpoint to deberta_amazon_reviews_v1
    Configuration saved in deberta_amazon_reviews_v1/config.json
    Model weights saved in deberta_amazon_reviews_v1/pytorch_model.bin
    tokenizer config file saved in deberta_amazon_reviews_v1/tokenizer_config.json
    Special tokens file saved in deberta_amazon_reviews_v1/special_tokens_map.json
    added tokens file saved in deberta_amazon_reviews_v1/added_tokens.json
    Several commits (2) will be pushed upstream.
    The progress bars may be unreliable.
評估/分析模型
微調模型後,必須仔細分析其效能。 請注意,準確率等標準指標有助瞭解模型的大致表現,但未必足以評估模型在實際使用情境中的表現。 較好的做法是找出最能反映模型實際用途的指標,並在訓練期間和訓練後準確測量。
現在開始評估模型 🤿。
訓練後,模型已上載至 Hub 的 deberta_v3_amazon_reviews,第一步先從該處重新下載。
from transformers import AutoModelForSequenceClassification

model = AutoModelForSequenceClassification.from_pretrained("patrickvonplaten/deberta_v3_amazon_reviews")
Trainer 不但是出色的模型訓練類別,也可用來評估資料集上的模型。現在以之前相同的實例和函式建立 trainer,但這次不需要傳入訓練資料集。
trainer = Trainer(
    args=training_args,
    compute_metrics=compute_metrics,
    model=model,
    tokenizer=tokenizer,
    data_collator=data_collator,
)
我們使用 Trainer 的 predict 函式,以相同指標評估測試資料集上的模型。
prediction_metrics = trainer.predict(tokenized_datasets["test"]).metrics
prediction_metrics
輸出:
    ***** Running Prediction *****
      Num examples = 5000
      Batch size = 8
輸出:
    {'test_accuracy': 0.608,
     'test_loss': 0.9637690186500549,
     'test_runtime': 21.9574,
     'test_samples_per_second': 227.714,
     'test_steps_per_second': 28.464}
結果與驗證資料集上的表現非常相似,這通常是好跡象,表示模型沒有對測試資料集過度擬合。
不過,5 類分類任務的準確率只有 60%,遠稱不上完美;但我們是否需要所有類別都有很高準確率?
由於我們主要關注非常負面的客戶意見,現在只聚焦模型分類極度不滿客戶評論的表現。我們亦決定稍為協助模型:由我們處理所有分類為非常不滿或不滿的意見,以涵蓋接近 99% 的非常不滿訊息。同時,我們亦衡量這種做法能處理多少不滿訊息,以及回覆中性、滿意和非常滿意客戶訊息會造成多少不必要工作。
好,來寫新的 compute_metrics 函式。
import numpy as np

def compute_metrics(pred):
    pred_logits = pred.predictions
    pred_classes = np.argmax(pred_logits, axis=-1)
    labels = np.asarray(pred.label_ids)

    # First let's compute % of very unsatisfied messages we can catch
    very_unsatisfied_label_idx = (labels == 0)
    very_unsatisfied_pred = pred_classes[very_unsatisfied_label_idx]

    # Now both 0 and 1 labels are 0 labels the rest is > 0
    very_unsatisfied_pred = very_unsatisfied_pred * (very_unsatisfied_pred - 1)

    # Let's count how many labels are 0 -> that's the "very unsatisfied"-accuracy
    true_positives = sum(very_unsatisfied_pred == 0) / len(very_unsatisfied_pred)

    # Second let's compute how many satisfied messages we unnecessarily reply to
    satisfied_label_idx = (labels > 1)
    satisfied_pred = pred_classes[satisfied_label_idx]

    # how many predictions are labeled as unsatisfied over all satisfied messages?
    false_positives = sum(satisfied_pred <= 1) / len(satisfied_pred)

    return {"%_unsatisfied_replied": round(true_positives, 2), "%_satisfied_incorrectly_labels": round(false_positives, 2)}
再次建立 Trainer,以便輕鬆執行評估。
trainer = Trainer(
    args=training_args,
    compute_metrics=compute_metrics,
    model=model,
    tokenizer=tokenizer,
    data_collator=data_collator,
)
現在使用新的指標計算方式再評估一次,這次更符合我們的使用情境。
prediction_metrics = trainer.predict(tokenized_datasets["test"]).metrics
prediction_metrics
輸出:
    ***** Running Prediction *****
      Num examples = 5000
      Batch size = 8
輸出:
    {'test_%_satisfied_incorrectly_labels': 0.11733333333333333,
     'test_%_unsatisfied_replied': 0.949,
     'test_loss': 0.9637690186500549,
     'test_runtime': 22.8964,
     'test_samples_per_second': 218.375,
     'test_steps_per_second': 27.297}
不錯!結果已相當理想。我們可以自動識別約 95% 的非常不滿客戶,但代價是浪費資源處理 10% 的滿意客戶訊息。
快速計算一下。我們每天收到約 10,000 則訊息,預計其中約 500 則非常負面。使用自動篩選後,我們不必回覆全部 10,000 則訊息,只需查看 500 + 0.12 * 10,000 = 1700 則,並只需回覆 475 則,同時會錯過 5% 的訊息。相當不錯:在人手工作量減少 83% 的同時,只錯過 5% 極度不滿客戶!
顯然,這些數字並不代表實際使用情境能獲得的效益,但只要有足夠高質素的真實案例訓練資料,就能接近這個成果!
儲存結果
trainer.save_metrics("prediction", prediction_metrics)
然後再次將所有內容上載至 Hub。
trainer.push_to_hub()
輸出:
    Saving model checkpoint to deberta_amazon_reviews_v1
    Configuration saved in deberta_amazon_reviews_v1/config.json
    Model weights saved in deberta_amazon_reviews_v1/pytorch_model.bin
    tokenizer config file saved in deberta_amazon_reviews_v1/tokenizer_config.json
    Special tokens file saved in deberta_amazon_reviews_v1/special_tokens_map.json
    added tokens file saved in deberta_amazon_reviews_v1/added_tokens.json
    To https://huggingface.co/patrickvonplaten/deberta_amazon_reviews_v1
       599b891..ad77e6d  main -> main

    Dropping the following result as it does not have all the necessary fields:
    {'task': {'name': 'Text Classification', 'type': 'text-classification'}}
    To https://huggingface.co/patrickvonplaten/deberta_amazon_reviews_v1
       ad77e6d..13e5ddd  main -> main
資料現已儲存於此。
今天就到此為止 😎。最後,亦很值得在真實世界資料上測試模型。可直接在模型卡的推論小工具中進行:
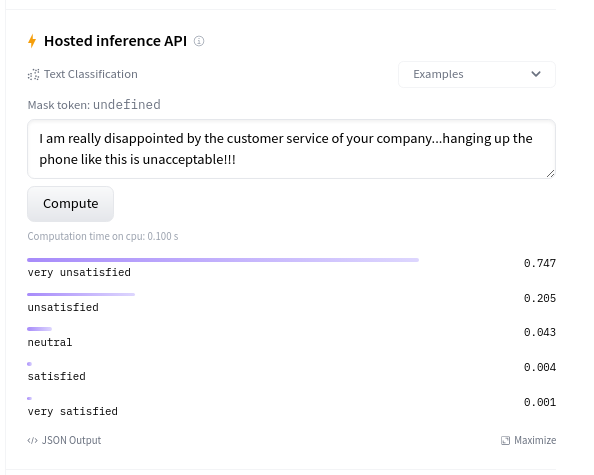
模型看來確實能很好地泛化至真實資料 🔥
最佳化
當你認為模型效能足以用於生產環境後,便要盡可能提升模型的記憶體效率和速度。
一些直接做法包括選擇最合適的加速硬件,例如效能更好的 GPU、確保前向傳播期間不計算梯度,或降低精度,例如改用 float16。
較進階的最佳化方法包括使用開源加速程式庫,例如 ONNX Runtime、量化,以及 Triton 等推論伺服器。
Hugging Face 一直致力簡化模型最佳化,尤其是透過開源的 Optimum 程式庫。Optimum 讓大部分 🤗 Transformers 模型都能輕鬆最佳化。
如果你想使用高度最佳化、不需技術知識的方案,或會對 Inference API 感興趣。這是即插即用服務,可在生產環境提供多種機器學習任務,包括情感分析。
此外,如果你需要支援自訂使用情境,Hugging Face 專家團隊可協助加速 ML 專案!從研究到生產的機器學習旅程中,我們的團隊會按需要回答問題、尋找解決方案。請瀏覽 hf.co/support 瞭解詳情及索取報價。
來源:Hugging Face Blog · huggingface.co