如何使用 Hugging Face Transformers 微調 Wav2Vec2 英語語音辨識模型
Fine-Tune Wav2Vec2 for English ASR in Hugging Face with 🤗 Transformers
Hugging Face 教學示範如何使用 Transformers 將預訓練的 Wav2Vec2 base 微調為英語自動語音辨識模型。示範使用含 5h 訓練資料的 TIMIT,並在不使用語言模型的情況下以 CTC 訓練。模型在 TIMIT 測試集的 WER 為 0.221(22.1%)。
這篇教學把資料清理、詞彙表與處理器設定、音訊取樣率處理、CTC 訓練及 WER 評估串成完整流程,並以 5h 的 TIMIT 訓練資料示範英語 ASR 微調。

Wav2Vec2 是一款預訓練自動語音辨識(ASR)模型,由 Alexei Baevski、Michael Auli 和 Alex Conneau 於2020 年 9 月發布。
Wav2Vec2 採用創新的對比式預訓練目標,從超過 50.000 小時的未標註語音中學習強大的語音表徵。與 BERT 的遮罩語言建模類似,模型會隨機遮罩特徵向量,再將其傳入 Transformer 網絡,藉此學習具上下文資訊的語音表徵。
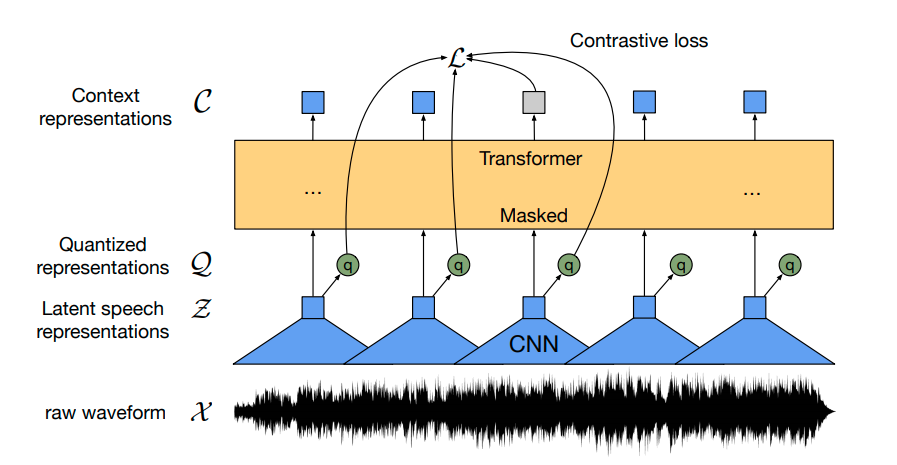
研究首次證明,先進行預訓練,再以極少量標註語音微調,便可取得媲美最先進 ASR 系統的成果。只需 10 分鐘標註資料,Wav2Vec2 在 LibriSpeech 的乾淨測試集上便能達到低於 5% 的詞錯誤率(WER),參見論文的表 9:論文。
本 notebook 會詳細説明如何在任何英文 ASR 資料集上微調 Wav2Vec2 預訓練檢查點。請注意,本 notebook 不會使用語言模型來微調 Wav2Vec2。不使用語言模型、直接將 Wav2Vec2 作端到端 ASR 系統會簡單得多,而且已有研究顯示獨立的 Wav2Vec2 聲學模型表現出色。為了示範,我們會在「base」規模的預訓練檢查點上微調規模相當小、只有 5 小時訓練資料的 Timit 資料集。
Wav2Vec2 使用連結時序分類(CTC)進行微調。CTC 是訓練序列轉序列神經網絡的演算法,主要用於自動語音辨識和手寫辨識。
我強烈建議閲讀 Awni Hannun 撰寫、行文出色的網誌文章 以 CTC 進行序列建模(2017)。
開始前,先從 master 安裝 datasets 和 transformers。此外,載入音訊檔案需要 soundfile 套件,並需要 jiwer 以使用詞錯誤率(WER)指標評估微調後的模型 1{}^1。
!pip install datasets>=1.18.3
!pip install transformers==4.11.3
!pip install librosa
!pip install jiwer
接着,我們強烈建議在訓練期間,直接將訓練檢查點上載至 Hugging Face Hub。Hub 整合了版本控制,確保訓練期間不會遺失模型檢查點。
為此,你需要在 Hugging Face 網站儲存驗證 token(如果尚未註冊,請到此註冊!)
from huggingface_hub import notebook_login

notebook_login()
輸出:
Login successful
Your token has been saved to /root/.huggingface/token
Authenticated through git-crendential store but this isn't the helper defined on your machine.
You will have to re-authenticate when pushing to the Hugging Face Hub. Run the following command in your terminal to set it as the default

git config --global credential.helper store
接着安裝 Git-LFS,以便上載模型檢查點:
!apt install git-lfs
1{}^1 Timit 通常以音素錯誤率(PER)評估,但在 ASR 領域,最普遍的指標是詞錯誤率(WER)。為了讓本 notebook 盡可能通用,我們決定使用 WER 評估模型。
準備資料、Tokenizer 和特徵擷取器
ASR 模型會將語音轉錄成文字,因此我們同時需要特徵擷取器,將語音訊號處理成模型輸入格式,例如特徵向量;也需要 tokenizer,將模型輸出格式處理成文字。
因此,在 🤗 Transformers 中,Wav2Vec2 模型同時配備 tokenizer Wav2Vec2CTCTokenizer,以及特徵擷取器 Wav2Vec2FeatureExtractor。
先建立負責解碼模型預測的 tokenizer。
建立 Wav2Vec2CTCTokenizer
預訓練 Wav2Vec2 檢查點會將語音訊號映射至一連串上下文表徵,如上圖所示。經微調的 Wav2Vec2 檢查點需要將這些上下文表徵映射至對應轉錄文本,因此必須在 Transformer 區塊頂部加上一個線性層(圖中黃色部分)。此線性層用來將各上下文表徵分類至 token 類別,方式類似於,例如預訓練後在 BERT 嵌入層頂部加入線性層作進一步分類,參見 「BERT」部分的網誌文章。
此層的輸出大小對應詞彙表中的 token 數量,並非由 Wav2Vec2 的預訓練任務決定,而只取決於微調時使用的標註資料集。因此,第一步是查看 Timit,並根據資料集的轉錄文本定義詞彙表。
先載入資料集並查看其結構。
from datasets import load_dataset, load_metric

timit = load_dataset("timit_asr")

print(timit)
輸出:
    DatasetDict({
        train: Dataset({
            features: ['file', 'audio', 'text', 'phonetic_detail', 'word_detail', 'dialect_region', 'sentence_type', 'speaker_id', 'id'],
            num_rows: 4620
        })
        test: Dataset({
            features: ['file', 'audio', 'text', 'phonetic_detail', 'word_detail', 'dialect_region', 'sentence_type', 'speaker_id', 'id'],
            num_rows: 1680
        })
    })
許多 ASR 資料集只提供目標文字 'text',以及每個音訊檔案 'file'。Timit 實際上提供更多音訊檔案資訊,例如 'phonetic_detail' 等,因此不少研究人員使用 Timit 時會評估音素分類,而非語音辨識。不過,為了盡可能讓本 notebook 通用,我們只會使用轉錄文本進行微調。
timit = timit.remove_columns(["phonetic_detail", "word_detail", "dialect_region", "id", "sentence_type", "speaker_id"])
寫一個簡短函式,顯示資料集中的一些隨機樣本,並執行數次以熟悉轉錄內容。
from datasets import ClassLabel
import random
import pandas as pd
from IPython.display import display, HTML

def show_random_elements(dataset, num_examples=10):
    assert num_examples <= len(dataset), "Can't pick more elements than there are in the dataset."
    picks = []
    for _ in range(num_examples):
        pick = random.randint(0, len(dataset)-1)
        while pick in picks:
            pick = random.randint(0, len(dataset)-1)
        picks.append(pick)

    df = pd.DataFrame(dataset[picks])
    display(HTML(df.to_html()))

show_random_elements(timit["train"].remove_columns(["file", "audio"]))
輸出:
| 索引 | 轉錄文本 |
|---|---|
| 1 | Who took the kayak down the bayou? |
| 2 | As such it acts as an anchor for the people. |
| 3 | She had your dark suit in greasy wash water all year. |
| 4 | We're not drunkards, she said. |
| 5 | The most recent geological survey found seismic activity. |
| 6 | Alimony harms a divorced man's wealth. |
| 7 | Our entire economy will have a terrific uplift. |
| 8 | Don't ask me to carry an oily rag like that. |
| 9 | The gorgeous butterfly ate a lot of nectar. |
| 10 | Where're you takin' me? |
好!轉錄看來相當乾淨,語言形式亦較像書面文字而非對話。考慮到 Timit 是朗讀語音語料庫,這並不意外。
轉錄中有一些特殊字元,例如 ,.?!;:。不使用語言模型時,較難將語音片段分類為這些特殊字元,因為它們通常不對應明確的聲音單位。例如,字母 "s" 有相對清晰的發音,但特殊字元 "." 沒有。此外,理解語音訊號的意思通常不需要在轉錄中包含特殊字元。
此外,我們會將文本標準化,只保留小寫字母。
import re
chars_to_ignore_regex = '[\,\?\.\!\-\;\:\"]'

def remove_special_characters(batch):
    batch["text"] = re.sub(chars_to_ignore_regex, '', batch["text"]).lower()
    return batch

timit = timit.map(remove_special_characters)
現在看看預處理後的轉錄。
show_random_elements(timit["train"].remove_columns(["file", "audio"]))
輸出:
| 索引 | 轉錄文本 |
|---|---|
| 1 | anyhow it was high time the boy was salted |
| 2 | their basis seems deeper than mere authority |
| 3 | only the best players enjoy popularity |
| 4 | tornados often destroy acres of farm land |
| 5 | where're you takin' me |
| 6 | soak up local color |
| 7 | satellites sputniks rockets balloons what next |
| 8 | i gave them several choices and let them set the priorities |
| 9 | reading in poor light gives you eyestrain |
| 10 | that dog chases cats mercilessly |
很好!這樣看來更理想。我們已從轉錄中移除大部分特殊字元,並將其統一轉為小寫。
CTC 通常會將語音片段分類為字母,因此我們也採用同樣做法。從訓練和測試資料中擷取所有不同字母,並以這組字母建立詞彙表。
我們會編寫映射函式,先將所有轉錄串接成一段長文本,再將字串轉換成字元集合。請務必傳入 batched=True 參數給 map(...) 函式,讓映射函式一次取得所有轉錄。
def extract_all_chars(batch):
  all_text = " ".join(batch["text"])
  vocab = list(set(all_text))
  return {"vocab": [vocab], "all_text": [all_text]}

vocabs = timit.map(extract_all_chars, batched=True, batch_size=-1, keep_in_memory=True, remove_columns=timit.column_names["train"])
現在合併訓練和測試資料集中的所有不同字母,並將結果清單轉換成帶有索引的字典。
vocab_list = list(set(vocabs["train"]["vocab"][0]) | set(vocabs["test"]["vocab"][0]))

vocab_dict = {v: k for k, v in enumerate(vocab_list)}
vocab_dict
輸出:
{
     ' ': 21,
     "'": 13,
     'a': 24,
     'b': 17,
     'c': 25,
     'd': 2,
     'e': 9,
     'f': 14,
     'g': 22,
     'h': 8,
     'i': 4,
     'j': 18,
     'k': 5,
     'l': 16,
     'm': 6,
     'n': 7,
     'o': 10,
     'p': 19,
     'q': 3,
     'r': 20,
     's': 11,
     't': 0,
     'u': 26,
     'v': 27,
     'w': 1,
     'x': 23,
     'y': 15,
     'z': 12
}
很好,可以看到資料集包含所有英文字母(這並不令人意外),亦擷取到特殊字元 " " 和 '。我們沒有排除這些特殊字元,原因如下:
- 模型必須學會預測單字何時結束,否則模型預測只會是一連串字元,無法分隔不同單字。
- 在英文中,我們需要保留
'字元來區分不同單字,例如"it's"和"its",兩者意思截然不同。
為了清楚表示 " " 有自己的 token 類別,我們將它替換成更顯眼的字元 |。此外,亦加入「未知」token,讓模型之後能處理 Timit 訓練集中未出現的字元。
vocab_dict["|"] = vocab_dict[" "]
del vocab_dict[" "]
最後,我們亦加入對應 CTC「空白 token」的填充 token。空白 token 是 CTC 演算法的核心組件。詳情請參閲此處的「對齊」一節。
vocab_dict["[UNK]"] = len(vocab_dict)
vocab_dict["[PAD]"] = len(vocab_dict)
print(len(vocab_dict))
輸出:
30
很好,詞彙表已完成,共有 30 個 token;因此,我們會在預訓練 Wav2Vec2 檢查點頂部新增一個輸出維度為 30 的線性層。
現在將詞彙表儲存為 JSON 檔案。
import json
with open('vocab.json', 'w') as vocab_file:
    json.dump(vocab_dict, vocab_file)
最後,使用 JSON 檔案建立 Wav2Vec2CTCTokenizer 類別的物件。
from transformers import Wav2Vec2CTCTokenizer

tokenizer = Wav2Vec2CTCTokenizer("./vocab.json", unk_token="[UNK]", pad_token="[PAD]", word_delimiter_token="|")
如果想在本 notebook 微調後的模型中重用剛建立的 tokenizer,強烈建議將 tokenizer 上載至 🤗 Hub。我們將要上載檔案的儲存庫命名為 "wav2vec2-large-xlsr-turkish-demo-colab":
repo_name = "wav2vec2-base-timit-demo-colab"
然後將 tokenizer 上載至 🤗 Hub。
tokenizer.push_to_hub(repo_name)
很好,你可以在 https://huggingface.co/<your-username>/wav2vec2-base-timit-demo-colab 查看剛建立的儲存庫。
建立 Wav2Vec2 特徵擷取器
語音是連續訊號,電腦要處理它,必須先將其離散化,這通常稱為取樣。取樣率在此扮演重要角色,因為它定義每秒量度多少個語音訊號資料點。因此,較高取樣率能更準確近似真實語音訊號,但每秒亦需要處理更多數值。
預訓練檢查點預期輸入資料的分佈與訓練資料大致相同。同一語音訊號以兩種不同取樣率處理時,分佈會大不相同;例如取樣率加倍後,資料點數量亦會加倍。因此,在微調預訓練 ASR 模型檢查點前,務必確認預訓練資料和微調資料集的取樣率相符。
Wav2Vec2 使用 LibriSpeech 和 LibriVox 的音訊資料進行預訓練,兩者取樣率都是 16kHz。幸好,我們的微調資料集 Timit 亦以 16kHz 取樣。如果微調資料集取樣率低於或高於 16kHz,我們就必須先對語音訊號升頻或降頻,使其符合預訓練資料的取樣率。
Wav2Vec2 特徵擷取器物件需要以下參數才能建立:
feature_size:語音模型以一連串特徵向量作為輸入。雖然序列長度顯然會變化,但特徵大小應維持不變。Wav2Vec2 的特徵大小為 1,因為模型以原始語音訊號訓練 2{}^2。sampling_rate:模型訓練時所用的取樣率。padding_value:批次推論時,較短輸入需要以特定值填充。do_normalize:是否將輸入標準化為零均值、單位方差。語音模型通常在輸入經標準化後表現更佳。return_attention_mask:批次推論時,模型是否應使用attention_mask。一般來説,模型應一律使用attention_mask遮罩填充 token。不過,由於Wav2Vec2「base」檢查點採用了非常特定的設計,不使用attention_mask反而效果較好。其他語音模型不建議這樣做。詳情請參閲此 issue。 重要:如果你要使用本 notebook 微調 large-lv60,此參數應設為True。
from transformers import Wav2Vec2FeatureExtractor

feature_extractor = Wav2Vec2FeatureExtractor(feature_size=1, sampling_rate=16000, padding_value=0.0, do_normalize=True, return_attention_mask=False)
很好,Wav2Vec2 特徵擷取流程已完整定義!
為了讓 Wav2Vec2 更容易使用,我們將特徵擷取器和 tokenizer 封裝在單一的 Wav2Vec2Processor 類別中,因此只需要 model 和 processor 物件。
from transformers import Wav2Vec2Processor

processor = Wav2Vec2Processor(feature_extractor=feature_extractor, tokenizer=tokenizer)
預處理資料
目前我們只看過轉錄,尚未查看語音訊號的實際數值。除了句子外,資料集還有 path 和 audio 兩個欄位。path 表示音訊檔案的絕對路徑。現在看看資料。
print(timit[0]["path"])
輸出:
'/root/.cache/huggingface/datasets/downloads/extracted/404950a46da14eac65eb4e2a8317b1372fb3971d980d91d5d5b221275b1fd7e0/data/TRAIN/DR4/MMDM0/SI681.WAV'
Wav2Vec2 預期輸入為 16 kHz 的 1 維陣列,也就是必須載入音訊檔案並重新取樣。
幸好,datasets 只要呼叫 audio 欄位就會自動完成這項工作。試試看。
common_voice_train[0]["audio"]
輸出:
{'array': array([-2.1362305e-04,  6.1035156e-05,  3.0517578e-05, ...,
        -3.0517578e-05, -9.1552734e-05, -6.1035156e-05], dtype=float32),
 'path': '/root/.cache/huggingface/datasets/downloads/extracted/404950a46da14eac65eb4e2a8317b1372fb3971d980d91d5d5b221275b1fd7e0/data/TRAIN/DR4/MMDM0/SI681.WAV',
 'sampling_rate': 16000}
可以看到音訊檔案已自動載入。這要歸功於 datasets 新增的"Audio" feature,版本為 datasets == 4.13.3,可在呼叫時即時載入並重新取樣音訊檔案。
取樣率已設為 16kHz,正是 Wav2Vec2 所需的輸入取樣率。
現在聽聽幾個音訊檔案,進一步瞭解資料集並確認音訊已正確載入。
import IPython.display as ipd
import numpy as np
import random

rand_int = random.randint(0, len(timit["train"]))

print(timit["train"][rand_int]["text"])
ipd.Audio(data=np.asarray(timit["train"][rand_int]["audio"]["array"]), autoplay=True, rate=16000)
可以聽到説話者、語速、口音等各有不同。不過,整體錄音相當清晰,這正是朗讀語音語料庫的預期特點。
最後再確認資料已正確準備:印出語音輸入的形狀、轉錄文本和對應取樣率。
rand_int = random.randint(0, len(timit["train"]))

print("Target text:", timit["train"][rand_int]["text"])
print("Input array shape:", np.asarray(timit["train"][rand_int]["audio"]["array"]).shape)
print("Sampling rate:", timit["train"][rand_int]["audio"]["sampling_rate"])
輸出:
    Target text: she had your dark suit in greasy wash water all year
    Input array shape: (52941,)
    Sampling rate: 16000
很好!一切正常:資料是 1 維陣列,取樣率一律為 16kHz,目標文本亦已標準化。
最後,將資料集處理成模型訓練所需格式。我們會使用 map(...) 函式。
首先,呼叫 batch["audio"] 載入並重新取樣音訊資料。
其次,從已載入的音訊檔案擷取 input_values。在此例中,Wav2Vec2Processor 只會將資料標準化;其他語音模型的這一步則可能包括更複雜的特徵擷取,例如 Log-Mel 特徵擷取。
第三,將轉錄文本編碼為標籤 ID。
注意:這個映射函式很好地示範瞭如何使用 Wav2Vec2Processor 類別。在一般情況下,呼叫 processor(...) 會轉交至 Wav2Vec2FeatureExtractor 的呼叫方法;但在 as_target_processor 上下文管理器中封裝 processor 時,同一方法會改為轉交至 Wav2Vec2CTCTokenizer 的呼叫方法。
詳情請參閲文件。
def prepare_dataset(batch):
    audio = batch["audio"]

    # batched output is "un-batched" to ensure mapping is correct
    batch["input_values"] = processor(audio["array"], sampling_rate=audio["sampling_rate"]).input_values[0]

    with processor.as_target_processor():
        batch["labels"] = processor(batch["text"]).input_ids
    return batch
將資料準備函式套用至所有樣本。
timit = timit.map(prepare_dataset, remove_columns=timit.column_names["train"], num_proc=4)
注意:目前 datasets 使用 torchaudio 和 librosa 載入及重新取樣音訊。如果你想自行實作自訂資料載入/取樣,可只使用 "path" 欄位,忽略 "audio" 欄位。
訓練與評估
資料已處理完成,現在可設定訓練流程。我們會使用 🤗 的 Trainer,基本上需要完成以下事項:
定義資料整理器。與大多數 NLP 模型不同,Wav2Vec2 的輸入序列遠長於輸出序列。例如,輸入長度為 50000 的樣本,輸出長度不會超過 100。由於輸入很長,動態填充訓練批次會更有效率;也就是每個訓練樣本只需填充至批次中最長樣本的長度,而非所有樣本中的最長長度。因此,微調 Wav2Vec2 需要專用的填充資料整理器,稍後會定義。
評估指標。訓練期間應使用詞錯誤率評估模型,因此要相應定義
compute_metrics函式。載入預訓練檢查點。需要載入預訓練檢查點,並為訓練正確設定。
定義訓練設定。
微調模型後,會在測試資料上正確評估,確認模型確實學會了正確轉錄語音。
設定 Trainer
先定義資料整理器。資料整理器程式碼複製自這個範例。
簡單來説,與常見資料整理器不同,此整理器會分別處理 input_values 和 labels,並各自套用填充函式(同樣使用 Wav2Vec2 的上下文管理器)。這是必要的,因為語音輸入和輸出屬於不同模態,不應使用相同填充函式處理。與常見資料整理器類似,標籤中的填充 token 會設為 -100,讓計算損失時不會納入這些 token。
import torch

from dataclasses import dataclass, field
from typing import Any, Dict, List, Optional, Union

@dataclass
class DataCollatorCTCWithPadding:
    """
    Data collator that will dynamically pad the inputs received.
    Args:
        processor (:class:`~transformers.Wav2Vec2Processor`)
            The processor used for processing the data.
        padding (:obj:`bool`, :obj:`str` or :class:`~transformers.tokenization_utils_base.PaddingStrategy`, `optional`, defaults to :obj:`True`):
            Select a strategy to pad the returned sequences (according to the model's padding side and padding index)
            among:
            * :obj:`True` or :obj:`'longest'`: Pad to the longest sequence in the batch (or no padding if only a single
              sequence if provided).
            * :obj:`'max_length'`: Pad to a maximum length specified with the argument :obj:`max_length` or to the
              maximum acceptable input length for the model if that argument is not provided.
            * :obj:`False` or :obj:`'do_not_pad'` (default): No padding (i.e., can output a batch with sequences of
              different lengths).
        max_length (:obj:`int`, `optional`):
            Maximum length of the ``input_values`` of the returned list and optionally padding length (see above).
        max_length_labels (:obj:`int`, `optional`):
            Maximum length of the ``labels`` returned list and optionally padding length (see above).
        pad_to_multiple_of (:obj:`int`, `optional`):
            If set will pad the sequence to a multiple of the provided value.
            This is especially useful to enable the use of Tensor Cores on NVIDIA hardware with compute capability >=
            7.5 (Volta).
    """

    processor: Wav2Vec2Processor
    padding: Union[bool, str] = True
    max_length: Optional[int] = None
    max_length_labels: Optional[int] = None
    pad_to_multiple_of: Optional[int] = None
    pad_to_multiple_of_labels: Optional[int] = None

    def __call__(self, features: List[Dict[str, Union[List[int], torch.Tensor]]]) -> Dict[str, torch.Tensor]:
        # split inputs and labels since they have to be of different lengths and need
        # different padding methods
        input_features = [{"input_values": feature["input_values"]} for feature in features]
        label_features = [{"input_ids": feature["labels"]} for feature in features]

        batch = self.processor.pad(
            input_features,
            padding=self.padding,
            max_length=self.max_length,
            pad_to_multiple_of=self.pad_to_multiple_of,
            return_tensors="pt",
        )
        with self.processor.as_target_processor():
            labels_batch = self.processor.pad(
                label_features,
                padding=self.padding,
                max_length=self.max_length_labels,
                pad_to_multiple_of=self.pad_to_multiple_of_labels,
                return_tensors="pt",
            )

        # replace padding with -100 to ignore loss correctly
        labels = labels_batch["input_ids"].masked_fill(labels_batch.attention_mask.ne(1), -100)

        batch["labels"] = labels

        return batch
初始化資料整理器。
data_collator = DataCollatorCTCWithPadding(processor=processor, padding=True)
接着定義評估指標。如前所述,ASR 最常用的指標是詞錯誤率(WER),因此本 notebook 亦會使用此指標。
wer_metric = load_metric("wer")
模型會回傳一連串 logit 向量:
y1,…,ym \mathbf{y}_1, \ldots, \mathbf{y}_m ,
其中 y1=fθ(x1,…,xn)[0]\mathbf{y}_1 = f_{\theta}(x_1, \ldots, x_n)[0],且 n>>mn >> m。
logit 向量 y1 \mathbf{y}_1 包含我們先前定義的詞彙表中每個詞的 log-odds,因此 len(yi)=\text{len}(\mathbf{y}_i) = config.vocab_size。我們只關心模型最可能的預測,因此對 logits 取 argmax(...)。此外,將編碼標籤中的 -100 替換為 pad_token_id,再解碼 ID 還原成原始字串,同時確保在 CTC 模式下不會將連續 token 合併成同一 token 1{}^1。
def compute_metrics(pred):
    pred_logits = pred.predictions
    pred_ids = np.argmax(pred_logits, axis=-1)

    pred.label_ids[pred.label_ids == -100] = processor.tokenizer.pad_token_id

    pred_str = processor.batch_decode(pred_ids)
    # we do not want to group tokens when computing the metrics
    label_str = processor.batch_decode(pred.label_ids, group_tokens=False)

    wer = wer_metric.compute(predictions=pred_str, references=label_str)

    return {"wer": wer}
現在載入預訓練的 Wav2Vec2 檢查點。Tokenizer 的 pad_token_id 必須用作模型的 pad_token_id;對 Wav2Vec2ForCTC 而言,它亦是 CTC 的空白 token 2{}^2。為節省 GPU 記憶體,我們啟用 PyTorch 的梯度檢查點,並將損失縮減方式設為「平均值」。
from transformers import Wav2Vec2ForCTC

model = Wav2Vec2ForCTC.from_pretrained(
    "facebook/wav2vec2-base",
    ctc_loss_reduction="mean",
    pad_token_id=processor.tokenizer.pad_token_id,
)
輸出:
    Some weights of Wav2Vec2ForCTC were not initialized from the model checkpoint at facebook/wav2vec2-base and are newly initialized: ['lm_head.weight', 'lm_head.bias']
    You should probably TRAIN this model on a down-stream task to be able to use it for predictions and inference.
Wav2Vec2 的第一個組件由一組 CNN 層組成,用來從原始語音訊號擷取具聲學意義、但彼此沒有上下文關係的特徵。此部分已在預訓練期間充分訓練,正如論文所述,無須再微調。因此,我們可將 requires_grad 設為 False,並套用至特徵擷取部分的所有參數。
model.freeze_feature_extractor()
最後一步是定義所有訓練相關參數。以下補充部分參數的説明:
group_by_length會將輸入長度相近的訓練樣本分到同一批次,令訓練更有效率。這可大幅減少傳入模型的無用填充 token 數量,顯著加快訓練。- 我們透過啟發式調整
learning_rate和weight_decay,直到微調過程穩定。請注意,這些參數高度依賴 Timit 資料集,套用至其他語音資料集時可能並非最佳設定。
其他參數的説明請參閲文件。
訓練期間,每 400 個訓練步驟會非同步上載一個檢查點至 Hub。即使模型仍在訓練,你也可使用示範小工具試用。
注意:若不想將模型檢查點上載至 Hub,只需將 push_to_hub=False 設定即可。
from transformers import TrainingArguments

training_args = TrainingArguments(
  output_dir=repo_name,
  group_by_length=True,
  per_device_train_batch_size=32,
  evaluation_strategy="steps",
  num_train_epochs=30,
  fp16=True,
  gradient_checkpointing=True,
  save_steps=500,
  eval_steps=500,
  logging_steps=500,
  learning_rate=1e-4,
  weight_decay=0.005,
  warmup_steps=1000,
  save_total_limit=2,
)
現在可將所有實例傳入 Trainer,準備開始訓練!
from transformers import Trainer

trainer = Trainer(
    model=model,
    data_collator=data_collator,
    args=training_args,
    compute_metrics=compute_metrics,
    train_dataset=timit_prepared["train"],
    eval_dataset=timit_prepared["test"],
    tokenizer=processor.feature_extractor,
)
1{}^1 為了讓模型不受説話速度影響,CTC 會將相同的連續 token 合併成一個 token。不過,解碼時不應合併編碼標籤,因為它們並非模型預測出的 token,因此必須傳入 group_tokens=False 參數。若不傳入此參數,像 "hello" 這樣的單字便會被錯誤編碼,解碼成 "helo"。
2{}^2 空白 token 讓模型能預測像 "hello" 這樣的單字,方法是在兩個 l 之間插入空白 token。模型對 "hello" 的 CTC 相符預測可能是 [PAD] [PAD] "h" "e" "e" "l" "l" [PAD] "l" "o" "o" [PAD]。
訓練
訓練時間約需 90 至 180 分鐘,視乎此 notebook 所用 Google Colab 分配到的 GPU 而定。訓練後的模型在 Timit 測試資料上表現令人滿意,但絕非最佳微調模型。本 notebook 旨在示範如何在任何英文資料集上微調 Wav2Vec2 的 base、large 和 large-lv60 檢查點。
如果你打算使用此 Google Colab 微調模型,必須確保訓練不會因閒置而停止。一個簡單的解決方法,是將以下程式碼貼到此分頁的主控台(按滑鼠右鍵 -> 檢查 -> Console 分頁,然後貼上程式碼)。
function ConnectButton(){
    console.log("Connect pushed");
    document.querySelector("#top-toolbar > colab-connect-button").shadowRoot.querySelector("#connect").click()
}
setInterval(ConnectButton,60000);
trainer.train()
視乎 GPU 而定,你可能會遇到 "out-of-memory" 錯誤。此時最好將 per_device_train_batch_size 降至 16 或更低,並視情況使用gradient_accumulation。
輸出:
| 步數 | 訓練損失 | 驗證損失 | WER | 執行時間 | 每秒樣本數 |
|---|---|---|---|---|---|
| 500 | 3.758100 | 1.686157 | 0.945214 | 97.299000 | 17.266000 |
| 1000 | 0.691400 | 0.476487 | 0.391427 | 98.283300 | 17.093000 |
| 1500 | 0.202400 | 0.403425 | 0.330715 | 99.078100 | 16.956000 |
| 2000 | 0.115200 | 0.405025 | 0.307353 | 98.116500 | 17.122000 |
| 2500 | 0.075000 | 0.428119 | 0.294053 | 98.496500 | 17.056000 |
| 3000 | 0.058200 | 0.442629 | 0.287299 | 98.871300 | 16.992000 |
| 3500 | 0.047600 | 0.442619 | 0.285783 | 99.477500 | 16.888000 |
| 4000 | 0.034500 | 0.456989 | 0.282200 | 99.419100 | 16.898000 |
最終 WER 應低於 0.3,這算合理,因為最先進的音素錯誤率(PER)略低於 0.1(見排行榜),而 WER 通常高於 PER。
現在可將訓練結果上載至 Hub,只需執行以下指令:
trainer.push_to_hub()
現在可以與朋友、家人和喜愛的寵物分享此模型:他們都可以使用識別碼「your-username/the-name-you-picked」載入,例如:
from transformers import AutoModelForCTC, Wav2Vec2Processor

model = AutoModelForCTC.from_pretrained("patrickvonplaten/wav2vec2-base-timit-demo-colab")
processor = Wav2Vec2Processor.from_pretrained("patrickvonplaten/wav2vec2-base-timit-demo-colab")
評估
最後一部分會在測試集上評估微調模型,並稍作試用。
載入 processor 和 model。
processor = Wav2Vec2Processor.from_pretrained(repo_name)
model = Wav2Vec2ForCTC.from_pretrained(repo_name)
現在使用 map(...) 函式預測每個測試樣本的轉錄文本,並將預測儲存在資料集本身。我們將結果字典命名為 "results"。
注意:我們刻意使用 batch_size=1 評估測試資料集,原因見此issue。填充輸入與未填充輸入的輸出並非完全相同,因此不填充輸入可取得較佳 WER。
def map_to_result(batch):
  with torch.no_grad():
    input_values = torch.tensor(batch["input_values"], device="cuda").unsqueeze(0)
    logits = model(input_values).logits

  pred_ids = torch.argmax(logits, dim=-1)
  batch["pred_str"] = processor.batch_decode(pred_ids)[0]
  batch["text"] = processor.decode(batch["labels"], group_tokens=False)

  return batch

results = timit["test"].map(map_to_result, remove_columns=timit["test"].column_names)
現在計算整體 WER。
print("Test WER: {:.3f}".format(wer_metric.compute(predictions=results["pred_str"], references=results["text"])))
輸出:
Test WER: 0.221
WER 為 22.1%,不錯!我們的示範模型很可能足以登上官方排行榜。
現在查看一些預測結果,瞭解模型犯了哪些錯誤。
輸出:
show_random_elements(results.remove_columns(["speech", "sampling_rate"]))
| 預測文本 | 目標文本 |
|---|---|
| am to balence your employe you benefits package | aim to balance your employee benefit package |
| the fawlg prevented them from ariving on tom | the fog prevented them from arriving on time |
| young children should avoide exposure to contagieous diseases | young children should avoid exposure to contagious diseases |
| artifficial intelligence is for real | artificial intelligence is for real |
| their pcrops were two step latters a chair and a polmb fan | their props were two stepladders a chair and a palm fan |
| if people were more generous there would be no need for wealfare | if people were more generous there would be no need for welfare |
| the fish began to leep frantically on the surface of the small ac | the fish began to leap frantically on the surface of the small lake |
| her right hand eggs whenever the barametric pressur changes | her right hand aches whenever the barometric pressure changes |
| only lawyers loved miliunears | only lawyers love millionaires |
| the nearest cennagade may not be within wallkin distance | the nearest synagogue may not be within walking distance |
很明顯,預測轉錄在聲學上與目標文本非常相似,但經常出現拼寫或文法錯誤。不過,這並不令人意外,因為我們完全依賴 Wav2Vec2,沒有使用語言模型。
最後,為了更深入理解 CTC,值得仔細查看模型的實際輸出。將第一個測試樣本傳入模型,取得預測 ID,再轉換為對應 token。
model.to("cuda")

with torch.no_grad():
  logits = model(torch.tensor(timit["test"][:1]["input_values"], device="cuda")).logits

pred_ids = torch.argmax(logits, dim=-1)

# convert ids to tokens
" ".join(processor.tokenizer.convert_ids_to_tokens(pred_ids[0].tolist()))
輸出:
[PAD] [PAD] [PAD] [PAD] [PAD] [PAD] t t h e e | | b b [PAD] u u n n n g g [PAD] a [PAD] [PAD] l l [PAD] o o o [PAD] | w w a a [PAD] s s | | [PAD] [PAD] p l l e e [PAD] [PAD] s s e n n t t t [PAD] l l y y | | | s s [PAD] i i [PAD] t t t [PAD] u u u u [PAD] [PAD] [PAD] a a [PAD] t t e e e d d d | n n e e a a a r | | t h h e | | s s h h h [PAD] o o o [PAD] o o r r [PAD] [PAD] [PAD] [PAD] [PAD] [PAD] [PAD] [PAD] [PAD] [PAD] [PAD]
這項輸出應能更清楚説明 CTC 在實務中的運作方式。模型在一定程度上不受語速影響,因為它學會在待分類語音片段仍對應相同 token 時,只重複輸出同一 token。CTC 因此成為非常強大的語音辨識演算法,因為語音檔案的轉錄文本通常與訊號長度幾乎無關。
我再次建議讀者閲讀這篇非常出色的網誌文章,以進一步瞭解 CTC。
來源:Hugging Face Blog · huggingface.co