Amazon Bedrock AgentCore Gateway 如何設定 ServiceNow 的 OBO token exchange
ServiceNow on-behalf-of token exchange with Bedrock AgentCore Gateway
AWS 示範如何設定 Amazon Bedrock AgentCore Gateway,透過 Microsoft Entra ID 的 OBO token exchange,讓 AI agent 呼叫 ServiceNow REST API 時保留原用戶身份。
文章依次交代 Microsoft Entra ID、ServiceNow 與 AgentCore Gateway 的設定,呈現 OBO token 交換如何保留用戶身份並套用 ServiceNow 權限。
代表用戶與企業 API 互動的 AI 代理程式,必須在整個請求鏈中維持用戶身分。若沒有傳遞身分,下游服務收到的 API 呼叫便會顯示為應用程式本身發出,而非由發起操作的用戶發出。這會破壞稽核記錄、繞過用戶層級的存取控制,並違反最小權限原則。
Amazon Bedrock AgentCore 是一個可大規模建置、連接及最佳化代理程式的平台,支援任何框架或模型。本文示範如何設定 AgentCore Gateway(Amazon Bedrock AgentCore 的一項功能),以 Microsoft Entra ID 進行代表使用者(OBO)權杖交換。如此一來,AI 代理程式便可在保留呼叫用戶身分的同時,呼叫 ServiceNow REST API。你可在閘道目標上設定權杖交換,而 AgentCore Gateway 會在每次請求時執行交換。這種模式亦可套用於其他受 OAuth 保護的 REST API。
在正式環境中,你亦可將身分傳遞與 Amazon Bedrock Guardrails 配合使用,以篩選有害內容,並驗證代理程式的輸入及輸出。
解決方案概覽
此架構包含三個透過 AgentCore Gateway 連接的主要元件:
- 一個 AI 代理程式應用程式,透過 Microsoft Entra ID 的 OAuth 應用程式註冊受到保護。
- 一個使用 AgentCore Gateway 實作的模型上下文協定(MCP)伺服器,位於代理程式與 ServiceNow 之間。
- ServiceNow REST API,已設定與 Microsoft Entra ID 關聯的傳入 OAuth 整合。
下圖展示端對端解決方案架構,當中包括 AWS、Microsoft Entra ID 和 ServiceNow 的元件。
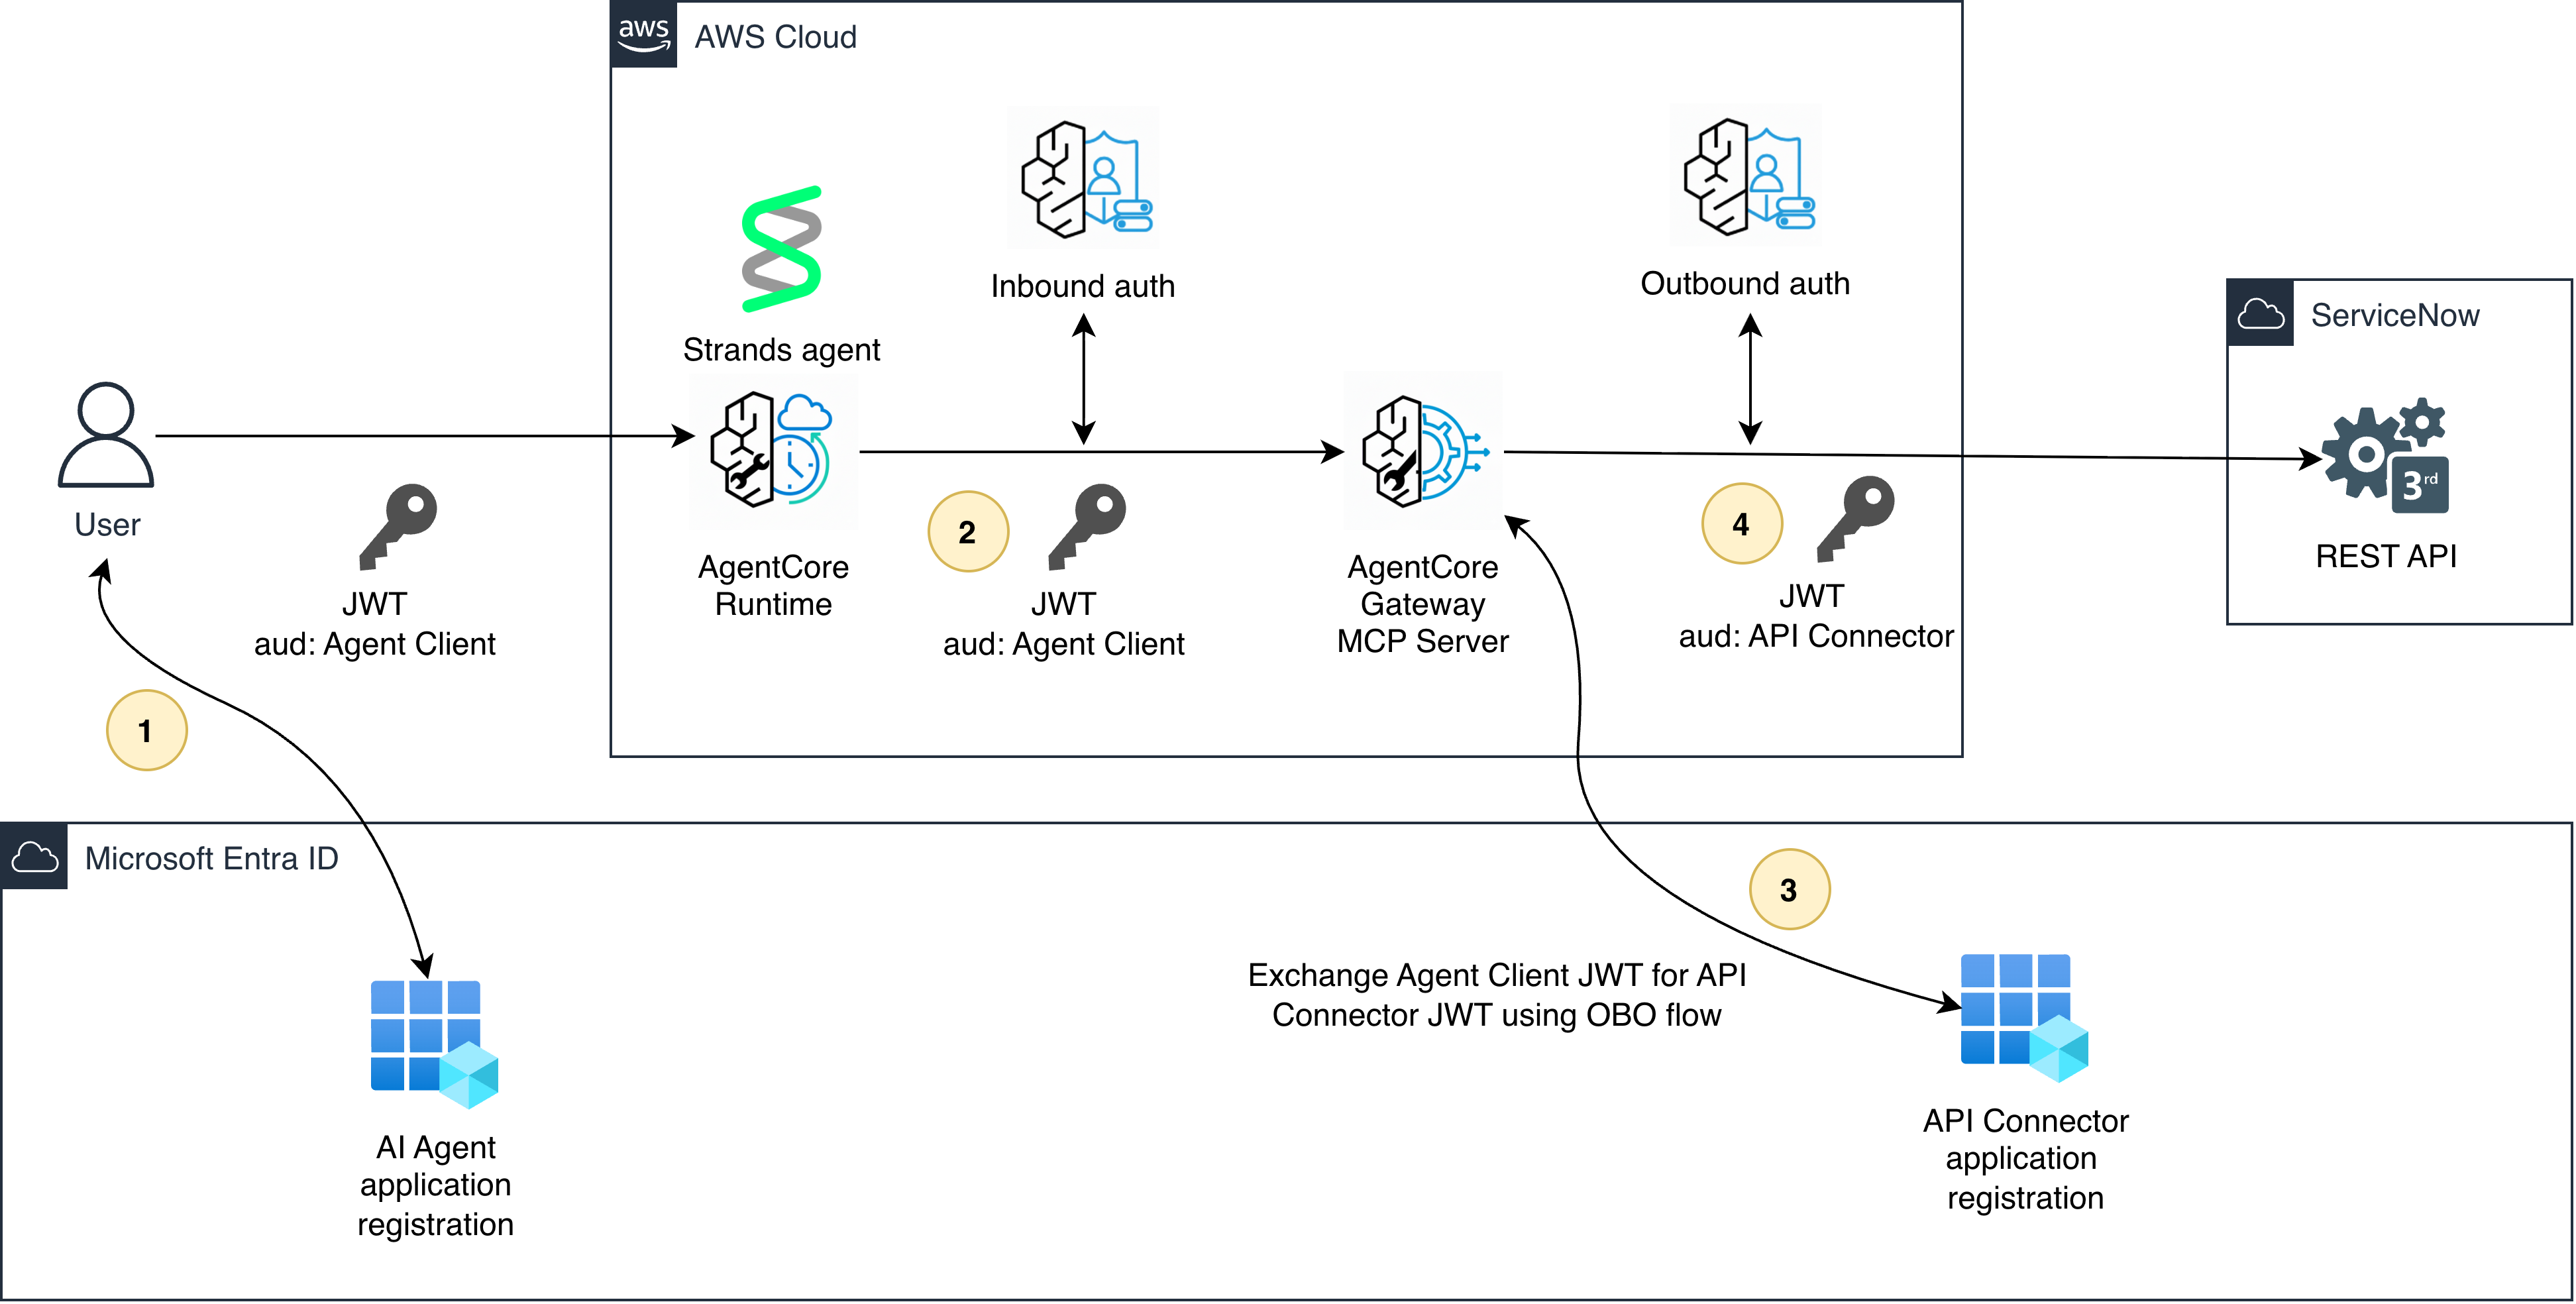
圖 1:跨 AWS、Microsoft Entra ID 和 ServiceNow 的解決方案架構
如圖 1 所示,用戶先取得 JSON Web Token(JWT)以呼叫代理程式 1。代理程式使用範圍設定為其本身應用程式註冊的 JWT 權杖向閘道進行驗證 2。接着,閘道使用 OBO 流程交換該權杖,取得一個範圍設定為 ServiceNow API 連接器的新權杖,同時保留原用戶的身分 3。ServiceNow 收到的有效權杖,其 preferred_username 宣告會對應至現有的 ServiceNow 用戶,並在 API 呼叫中套用該用戶的權限 4。
此情境中的 OBO 權杖交換運作方式
代理程式呼叫閘道時,會傳送一個 JWT,其 audience 宣告與代理程式的用戶端 ID 相符(例如 3ff88e17-XXXX-XXXX-XXXX-XXXXXXXXXXXX)。然而,ServiceNow 預期收到的權杖,其 audience 宣告須與其本身的 API 連接器用戶端 ID(5d4a7a11-XXXX-XXXX-XXXX-XXXXXXXXXXXX)相符。
OBO 流程可彌合這項差距。AgentCore Gateway 會將傳入權杖連同代理程式應用程式的用戶端憑證、目標範圍,以及參數 requested_token_use: on_behalf_of 一併傳送至 Entra 權杖端點。Entra 會驗證呼叫用戶是否已同意委派,然後為 ServiceNow API 簽發新權杖,並保留原用戶的宣告。
先決條件
開始之前,你需要準備以下項目:
- 一個可使用 AgentCore Gateway 的 AWS 帳戶。
- 一個具備建立應用程式註冊權限的 Microsoft Entra ID 租用戶。你的帳戶至少需要具備應用程式開發人員角色才能註冊應用程式。
- 一個具備管理員存取權限、可設定傳入 OAuth 整合的 ServiceNow 執行個體。你可在 ServiceNow 個人開發者執行個體註冊頁面建立 ServiceNow 個人開發者執行個體(PDI):https://developer.servicenow.com/。
- 兩個 Entra 應用程式註冊:一個代表 AI agent,另一個代表 ServiceNow API 連接器。
設定 Microsoft Entra ID
首先,建立一個代表 ServiceNow API 連接器的應用程式註冊。以下螢幕截圖顯示 Microsoft Entra ID 中 ServiceNow API Connector 的應用程式註冊頁面。
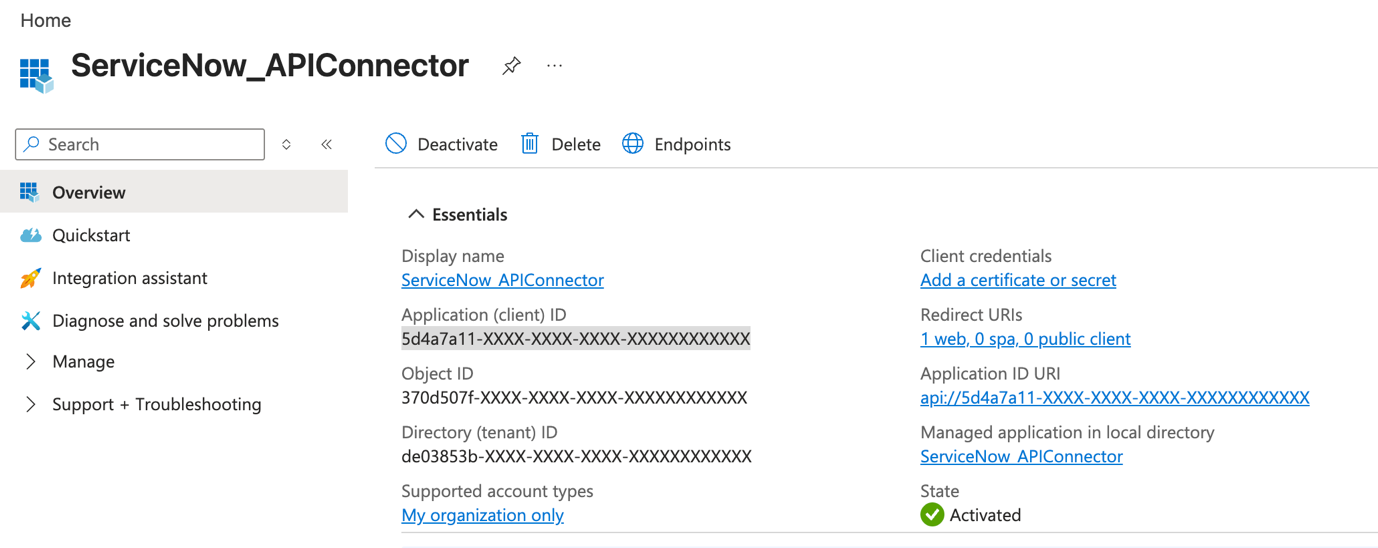
圖 2:Microsoft Entra ID 中 ServiceNow API 連接器的應用程式註冊
建立後,在「概觀」頁面記下應用程式(用戶端)ID。
在導覽功能表中展開管理,然後選取公開 API,並使用預設的應用程式 ID URI 新增名為 user_impersonation 的範圍。OBO 流程會在交換令牌時請求此範圍。以下螢幕截圖顯示如何在 Microsoft Entra ID 中公開 API。
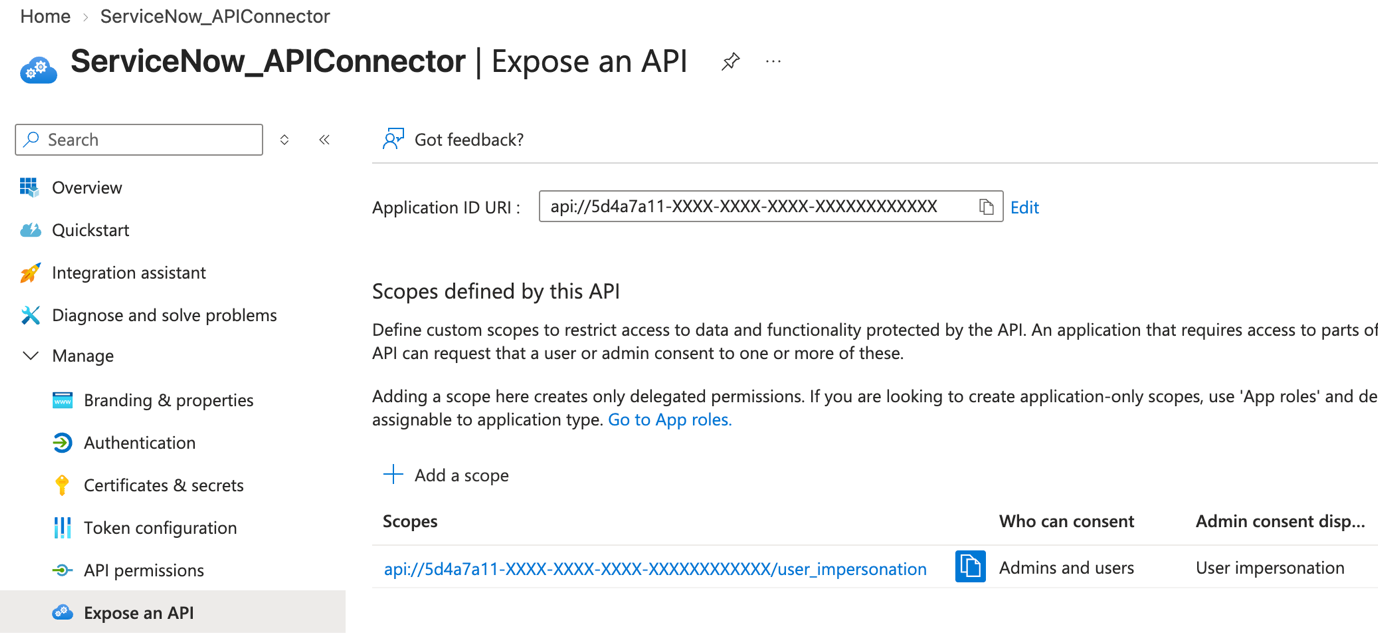
圖 3:在 Microsoft Entra ID 中公開 user_impersonation 範圍
接着,為 AI agent 建立一個應用程式註冊。以下螢幕截圖顯示 Microsoft Entra ID 中 ServiceNow Agent 應用程式的應用程式註冊頁面。
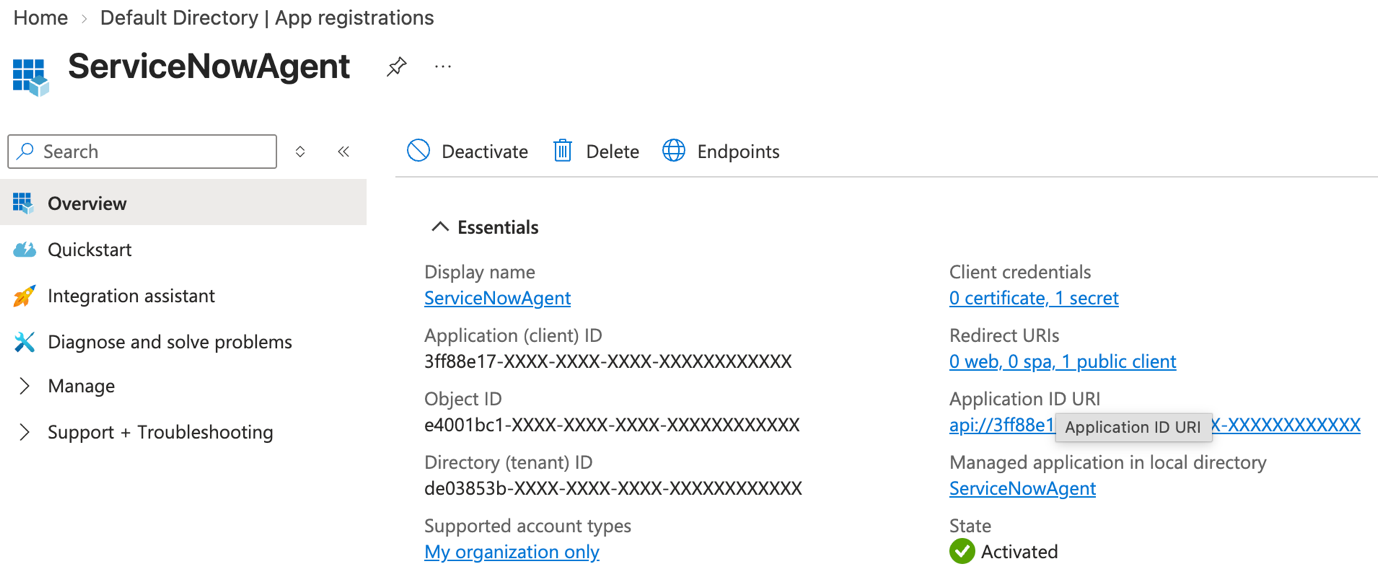
圖 4:Microsoft Entra ID 中 ServiceNow Agent 的應用程式註冊
記下 ServiceNowAgent 的應用程式(用戶端)ID。
在此註冊中建立用戶端密碼。閘道需要這些認證來執行 OBO 交換。以下螢幕截圖顯示如何在 Microsoft Entra ID 的 ServiceNow Agent 應用程式註冊中建立用戶端密碼。
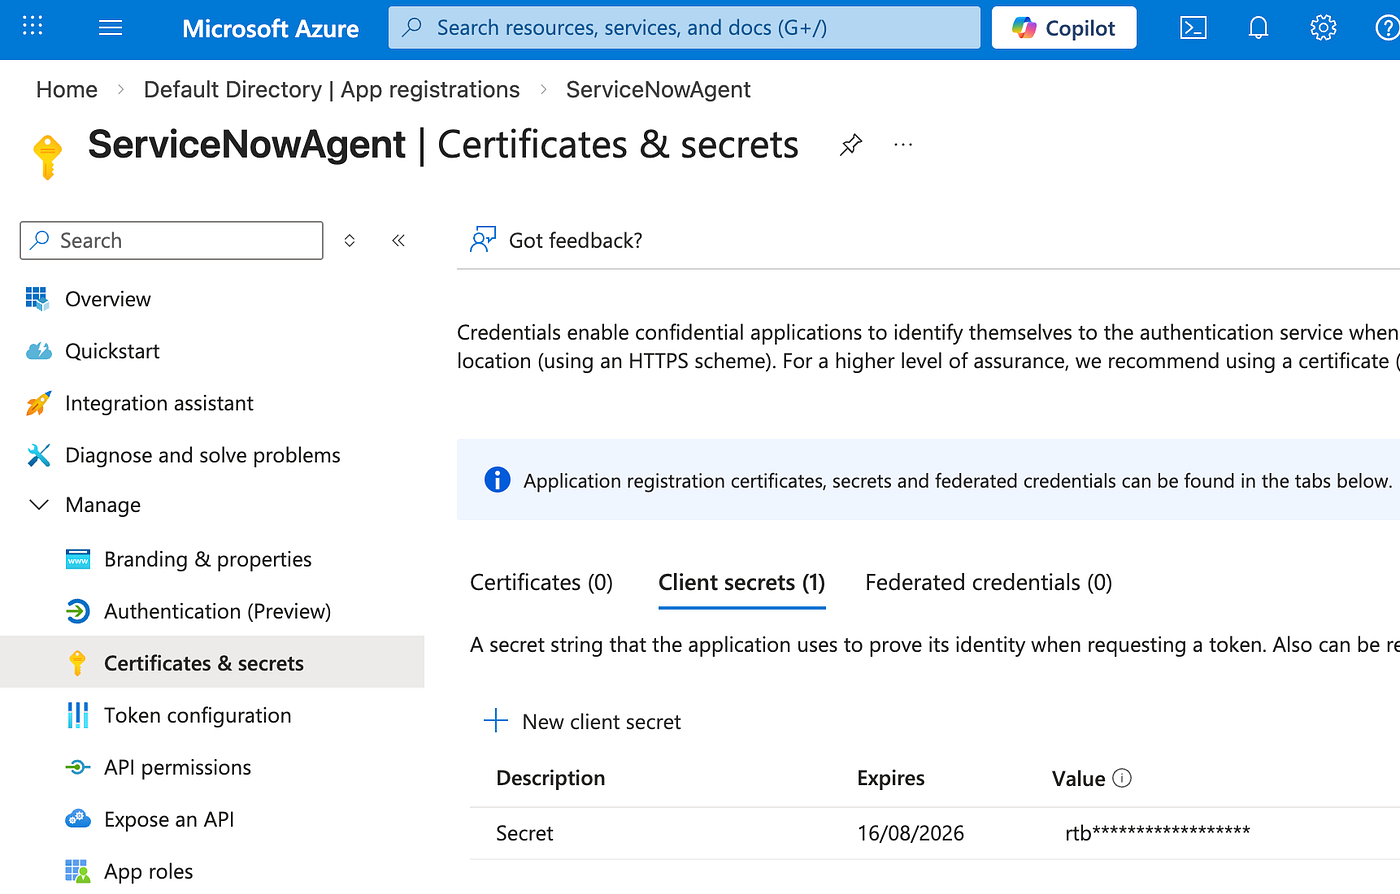
圖 5:在 ServiceNow Agent 應用程式註冊中建立用戶端密碼
然後,設定 agent 應用程式的 API 權限,讓它可以呼叫 ServiceNow API 連接器應用程式。以下螢幕截圖顯示需要在 Microsoft Entra ID 的 ServiceNow Agent 應用程式註冊中設定的 API 權限。
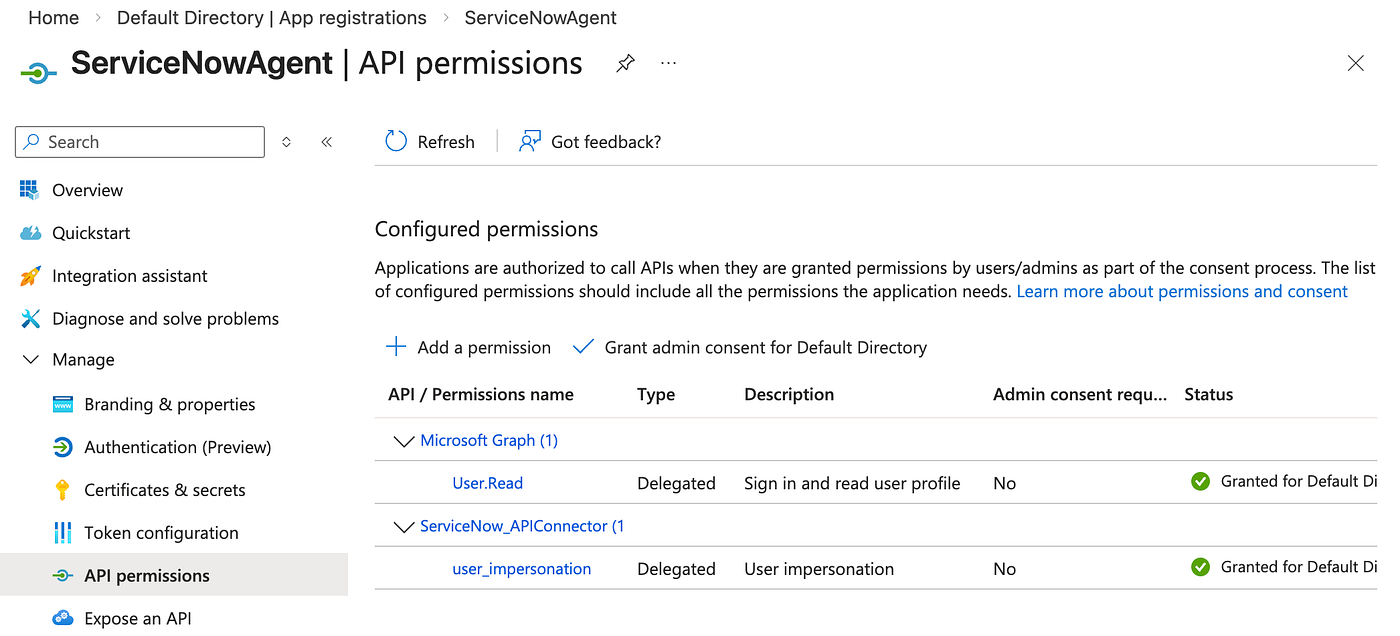
圖 6:在 Microsoft Entra ID 中設定 API 權限
除了兩個應用程式之間的標準 OBO 整合所需設定外,無需更改 Entra 設定。
設定 ServiceNow
在 ServiceNow 管理主控台中,前往System OAuth > Inbound Integrations,並建立新的輸入整合(由支援 OIDC 的身分識別提供者簽發的第三方 ID token)。指定你在 Entra 中建立的 ServiceNow API 連接器應用程式註冊的用戶端 ID。以下螢幕截圖顯示如何在 ServiceNow 中設定輸入整合。
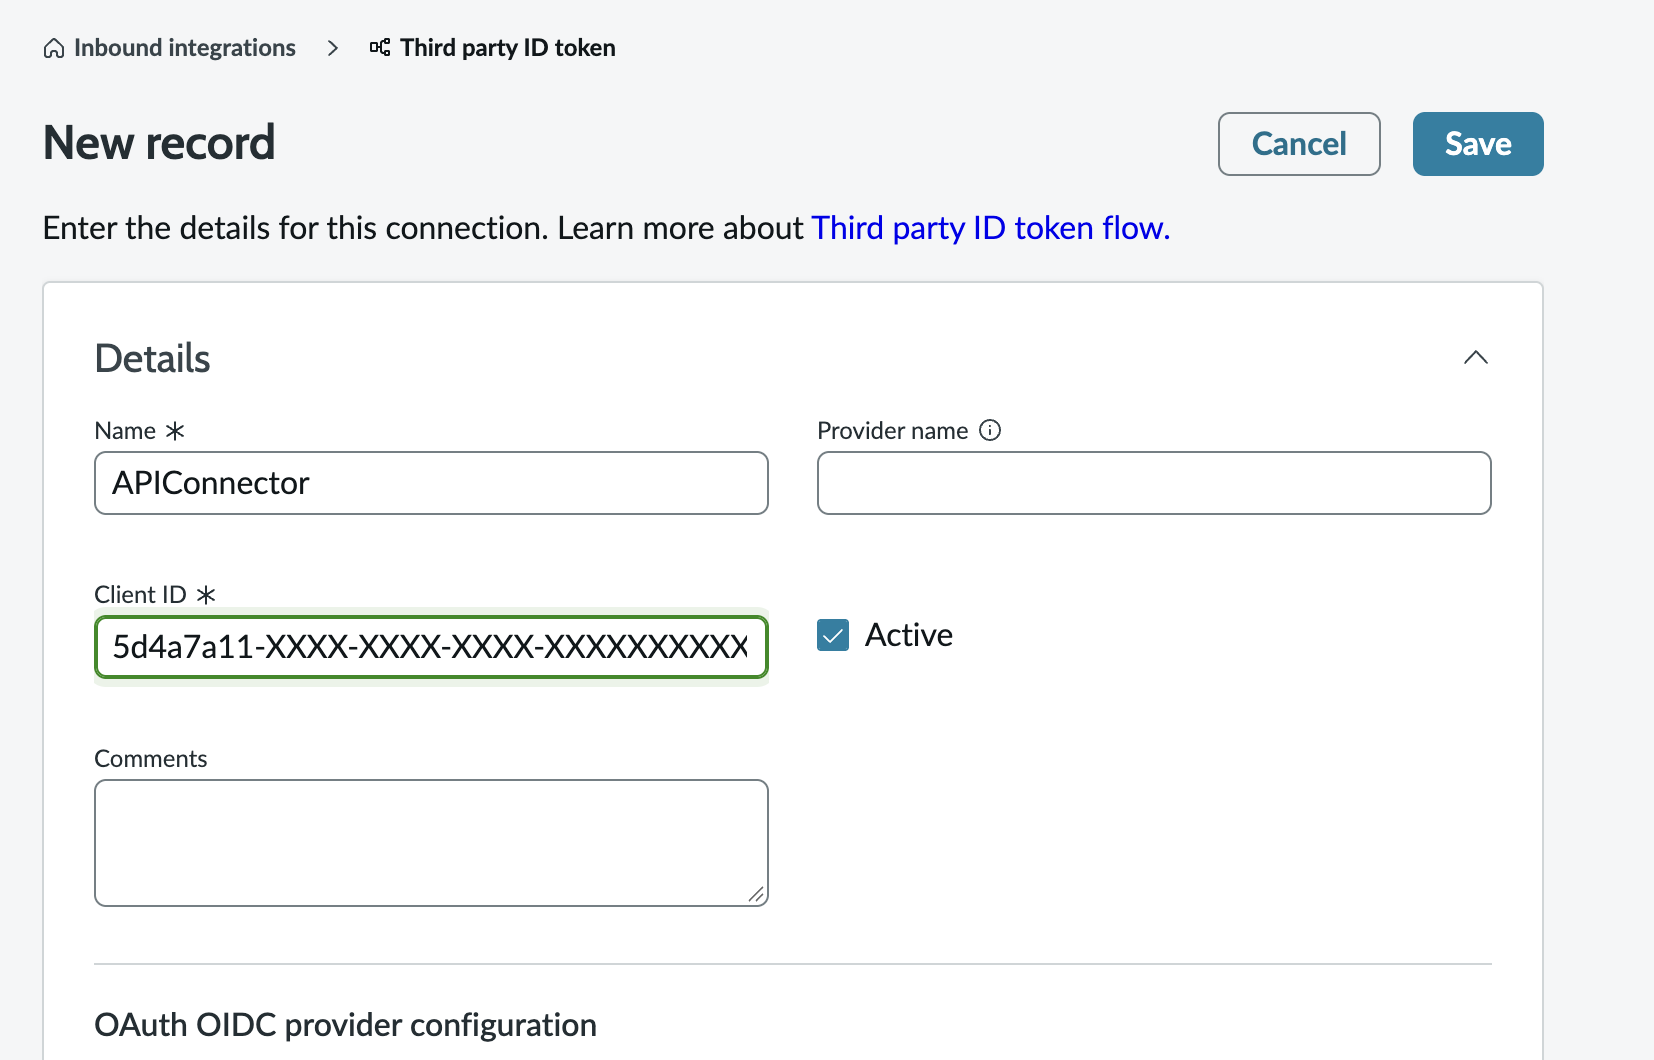
圖 7:在 ServiceNow 中設定輸入整合
在同一個畫面中,建立新的 OpenID Connect (OIDC) 提供者設定,並輸入 Entra 租用戶的 OIDC 中繼資料 URL。將用戶宣告對應至適當的用戶欄位。例如,如果 Entra 租用戶將用戶的電郵放在 preferred_username 宣告中,請將該宣告對應至 ServiceNow 的電郵欄位。如果 Entra 租用戶簽發的令牌不包含 JTI,請取消勾選 JTI 驗證。Entra 會在其簽發的令牌中使用名為 uti 的內部宣告,該宣告等同於 JTI。你可以考慮將此 uti 宣告對應至 jti 宣告,以提供額外的重播防護及拒絕清單機制。以下螢幕截圖顯示如何在 ServiceNow 中設定 OIDC 提供者。
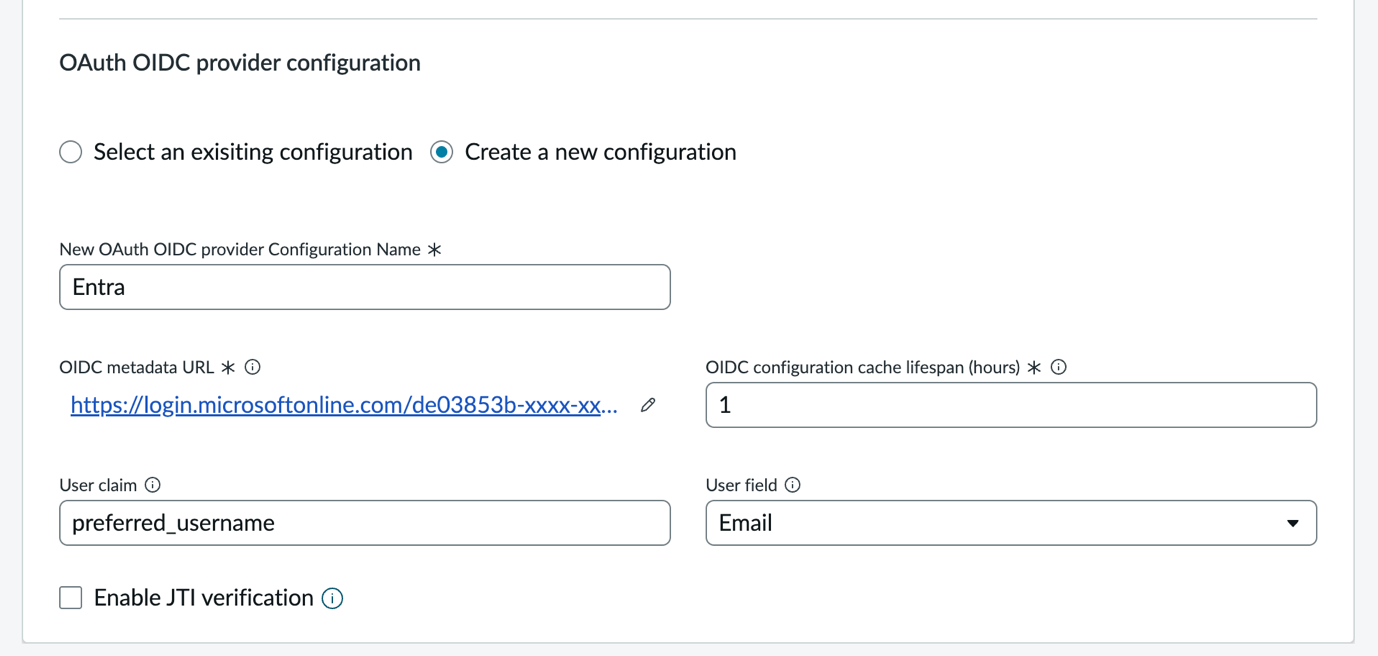
圖 8:在 ServiceNow 中設定 OAuth OIDC 提供者
最後,在同一個畫面中,為整合建立授權範圍(例如 APIConnector)。以下螢幕截圖顯示如何在 ServiceNow 中建立新的授權範圍。
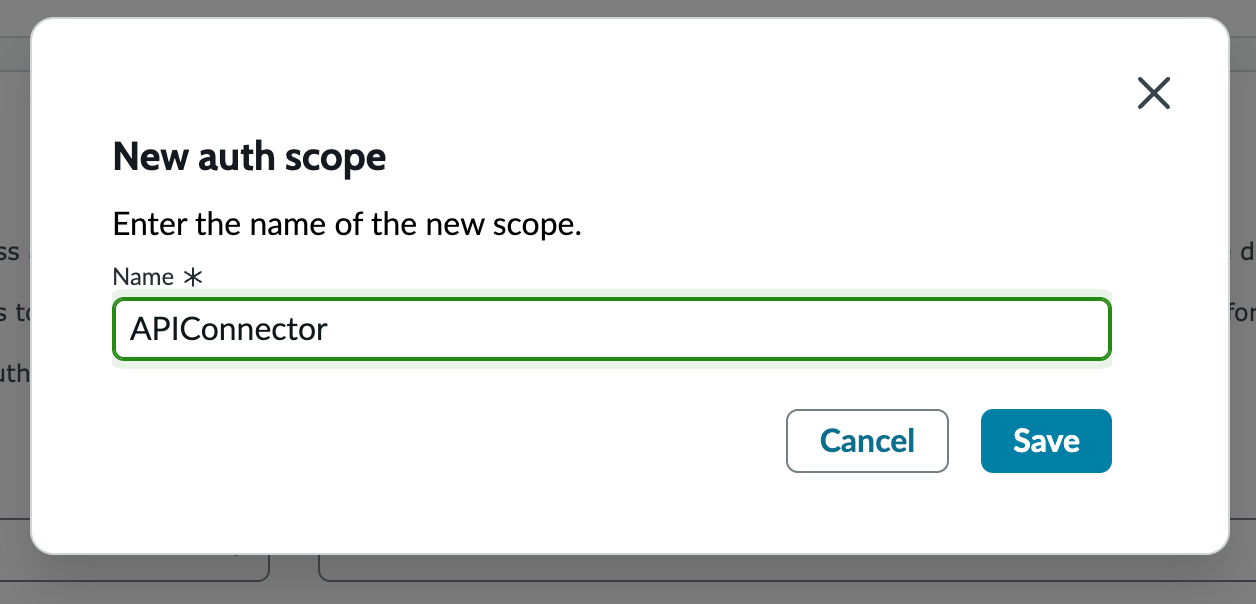
圖 9:在 ServiceNow 中建立新的授權範圍
將驗證範圍限制為 Table API,或代理程式需要存取的其他 ServiceNow API,如下方螢幕截圖所示。
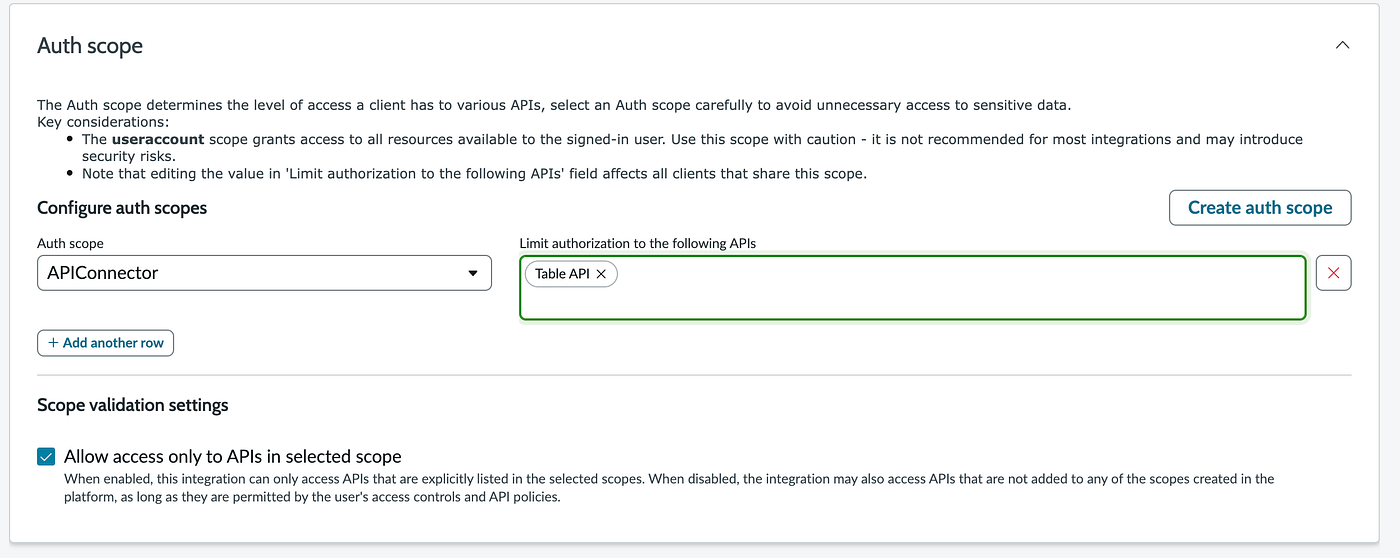
圖 10:將 ServiceNow 的驗證範圍限制為 Table API
完成此設定後,ServiceNow 會接受 audience 為 API 連接器的用戶端 ID 的授權權杖,並從 preferred_username 聲明解析發出呼叫的用戶。
設定 AgentCore Gateway
設定好 Entra 和 ServiceNow 後,現在可以設定 AgentCore Gateway,原生處理 OBO 交換。
步驟 1:建立輸出驗證設定
在 AgentCore 中建立新的輸出驗證設定(選擇 Build > Identity > Add Outbound Auth > Add OAuth client),並選擇 自訂提供者。輸入代理程式應用程式註冊中的用戶端 ID 和用戶端密碼,以及 Entra 探索 URL,如下方螢幕截圖所示。
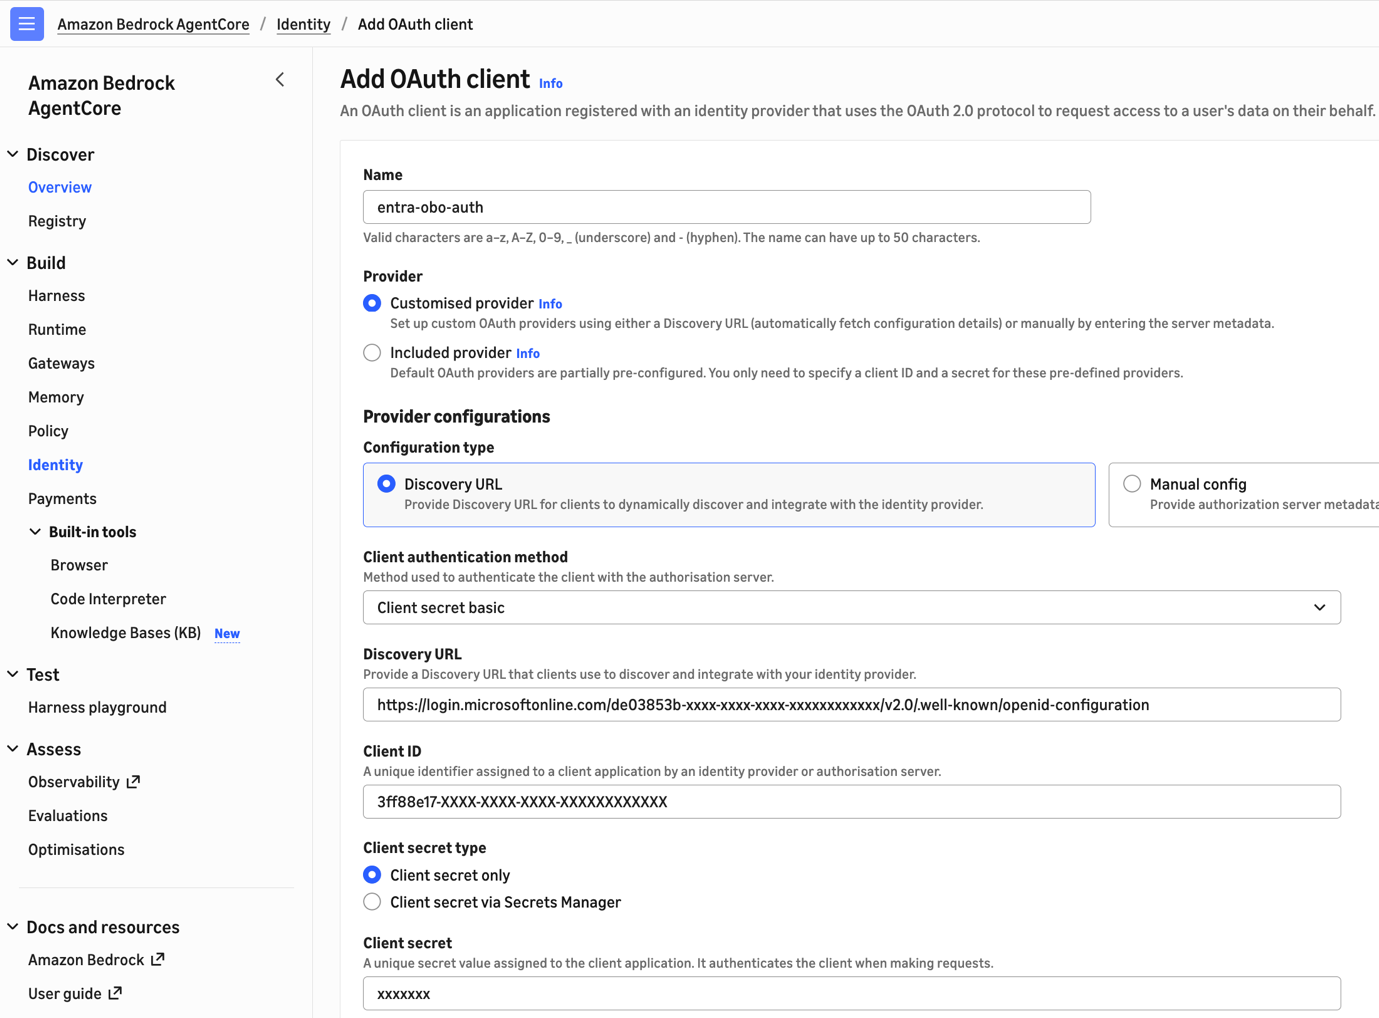
圖 11:在 AgentCore Gateway 中新增 OAuth 用戶端
展開 其他設定,並選擇 JWT 授權授予,如下方螢幕截圖所示。這會指示閘道使用以 JWT 為基礎的授予類型來交換權杖。
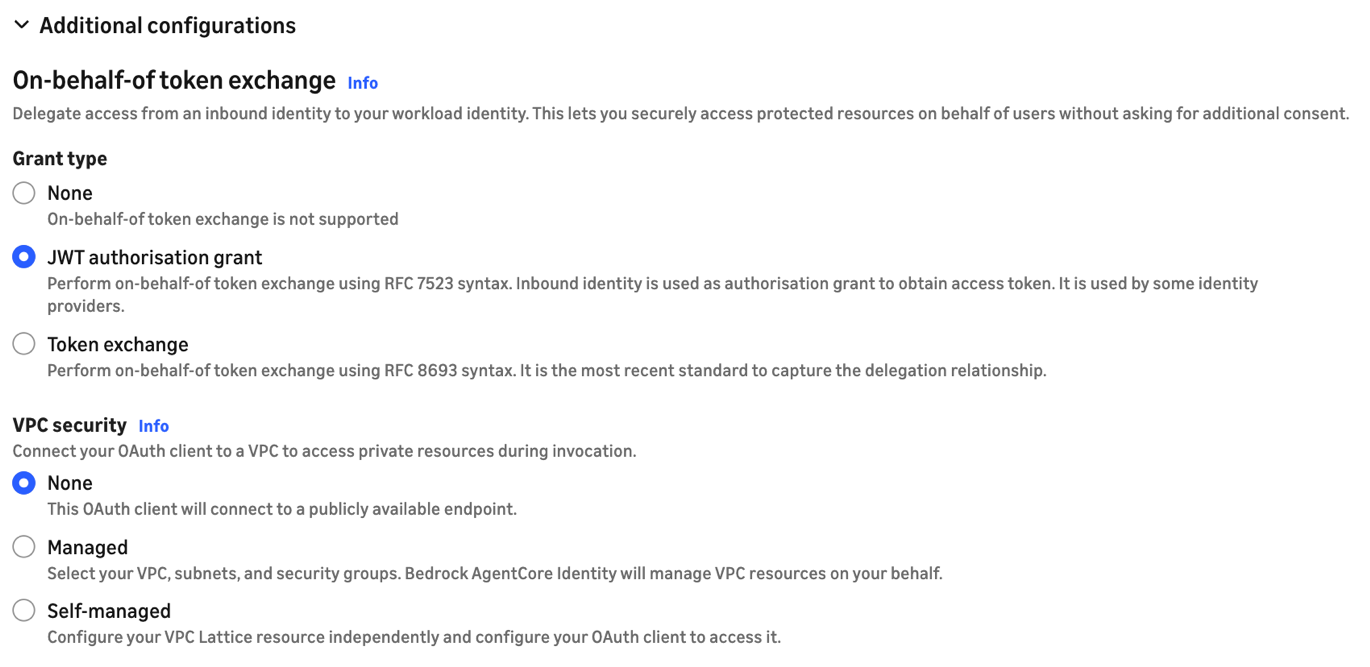
圖 12:設定 JWT 授權授予
步驟 2:使用 MCP 版本 2025-11-25 建立閘道
建立新的 AgentCore Gateway(Build > Gateways > Create gateway)。定義閘道詳細資料時,展開 其他設定 — 可選,並選擇 MCP 版本 2025-11-25,如下方螢幕截圖所示。原生 OBO 支援必須使用此版本。使用較早 MCP 版本建立的閘道無法啟用原生 OBO。

圖 13:選擇 MCP 版本 2025-11-25
使用代理程式的應用程式註冊設定入站身分識別(選擇 使用現有身分識別提供者設定),做法與設定任何接受 Entra 驗證要求的閘道相同。
在 JWT 授權設定下,加入我們先前記錄的 ServiceNowAgent 應用程式 ID,如下方螢幕截圖所示。
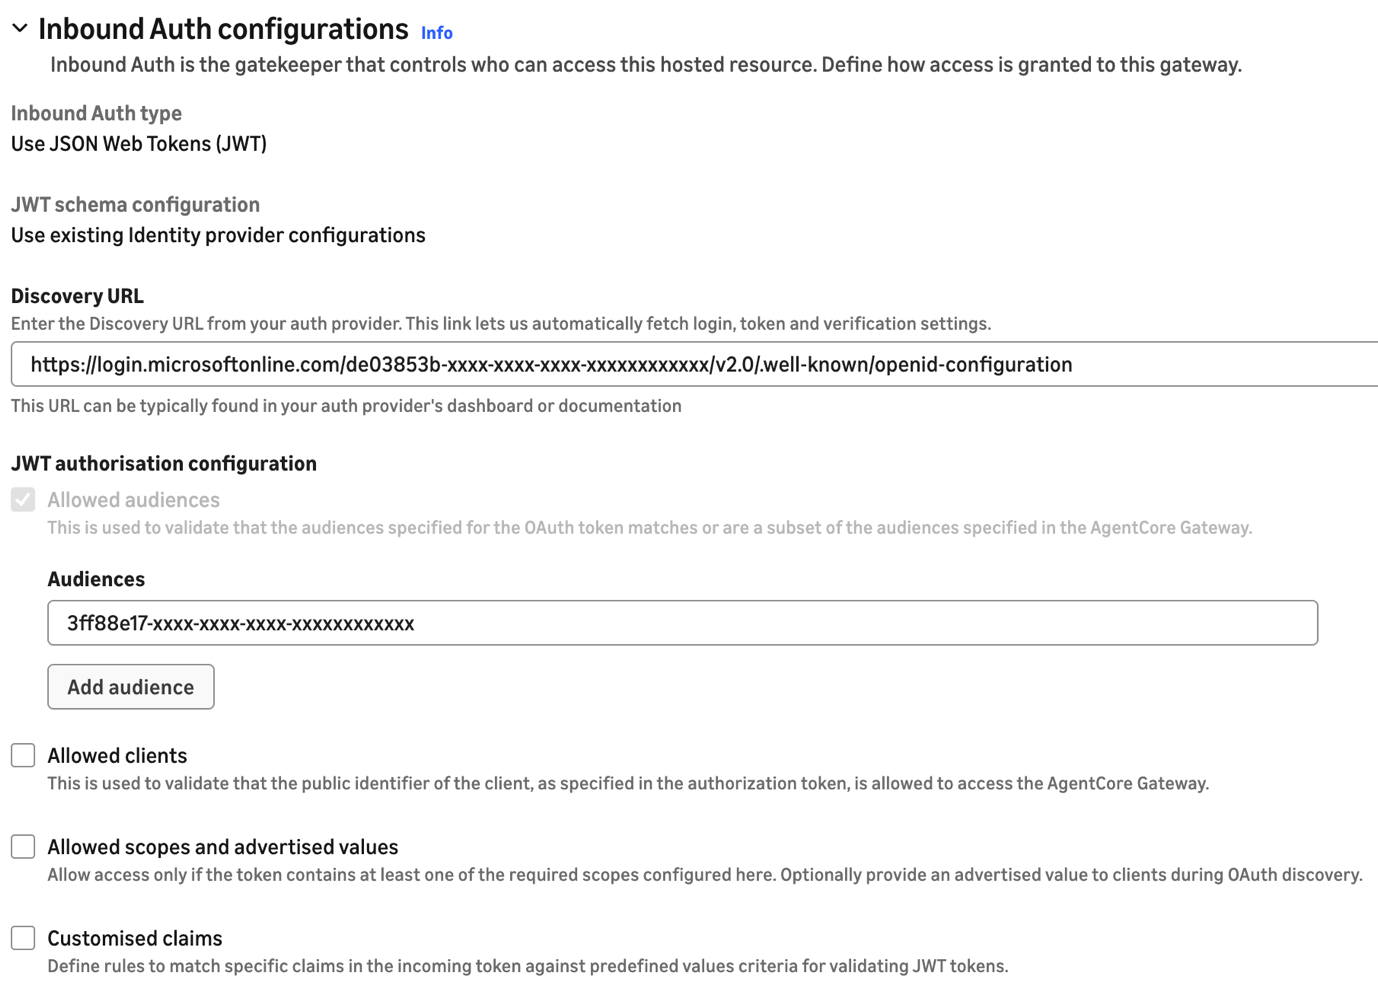
圖 14:在 AgentCore Gateway 中設定入站授權
步驟 3:新增使用權杖交換的目標
在閘道中新增目標,指向 ServiceNow REST 端點。直接內嵌定義結構描述。例如,如要公開名為 ListIncidents、會呼叫 ServiceNow Table API 的工具,可以使用以下 OpenAPI 規格(將伺服器 URL 換成你的 PDI 對應網址)。
{
  "openapi": "3.0.0",
  "info": {
    "title": "ServiceNow Incident API (Minimal)",
    "description": "A subset of the ServiceNow Table API for listing incident records.",
    "version": "1.0.0"
  },
  "servers": [
    {
      "url": "https://devxxx.service-now.com/api/now/table",
      "variables": {
        "instance": {
          "default": "devxxx",
          "description": "Your ServiceNow instance name."
        }
      }
    }
  ],
  "paths": {
    "/incident": {
      "get": {
        "operationId": "getIncidents",
        "summary": "List incidents",
        "description": "Retrieves a list of incident records from the ServiceNow instance.",
        "parameters": [
          {
            "name": "sysparm_limit",
            "in": "query",
            "description": "Maximum number of records to return.",
            "schema": {
              "type": "integer",
              "default": 10
            }
          },
          {
            "name": "sysparm_query",
            "in": "query",
            "description": "An encoded query string to filter results (e.g., active=true).",
            "schema": {
              "type": "string"
            }
          },
          {
            "name": "sysparm_fields",
            "in": "query",
            "description": "A comma-separated list of fields to return.",
            "schema": {
              "type": "string"
            }
          }
        ],
        "responses": {
          "200": {
            "description": "A successful response containing an array of incidents.",
            "content": {
              "application/json": {
                "schema": {
                  "type": "object",
                  "properties": {
                    "result": {
                      "type": "array",
                      "items": {
                        "$ref": "#/components/schemas/Incident"
                      }
                    }
                  }
                }
              }
            }
          },
          "401": {
            "description": "Unauthorized - Invalid credentials."
          }
        },
        "security": [
          {
            "bearerAuth": []
          }
        ]
      }
    }
  },
  "components": {
    "securitySchemes": {
      "bearerAuth": {
        "type": "http",
        "scheme": "bearer",
        "bearerFormat": "JWT"
      }
    },
    "schemas": {
      "Incident": {
        "type": "object",
        "properties": {
          "sys_id": {
            "type": "string",
            "description": "Unique identifier for the incident."
          },
          "number": {
            "type": "string",
            "description": "Incident ID (e.g., INC0000001)."
          },
          "short_description": {
            "type": "string",
            "description": "A brief summary of the incident."
          },
          "severity": {
            "type": "string",
            "description": "The severity level of the incident."
          },
          "state": {
            "type": "string",
            "description": "The current state of the incident (e.g., New, In Progress, Closed)."
          },
          "sys_created_on": {
            "type": "string",
            "format": "date-time",
            "description": "The timestamp when the incident was created."
          }
        }
      }
    }
  }
}
下方螢幕截圖顯示如何在 AgentCore Gateway 中使用 OpenAPI 結構描述設定 REST API 目標。
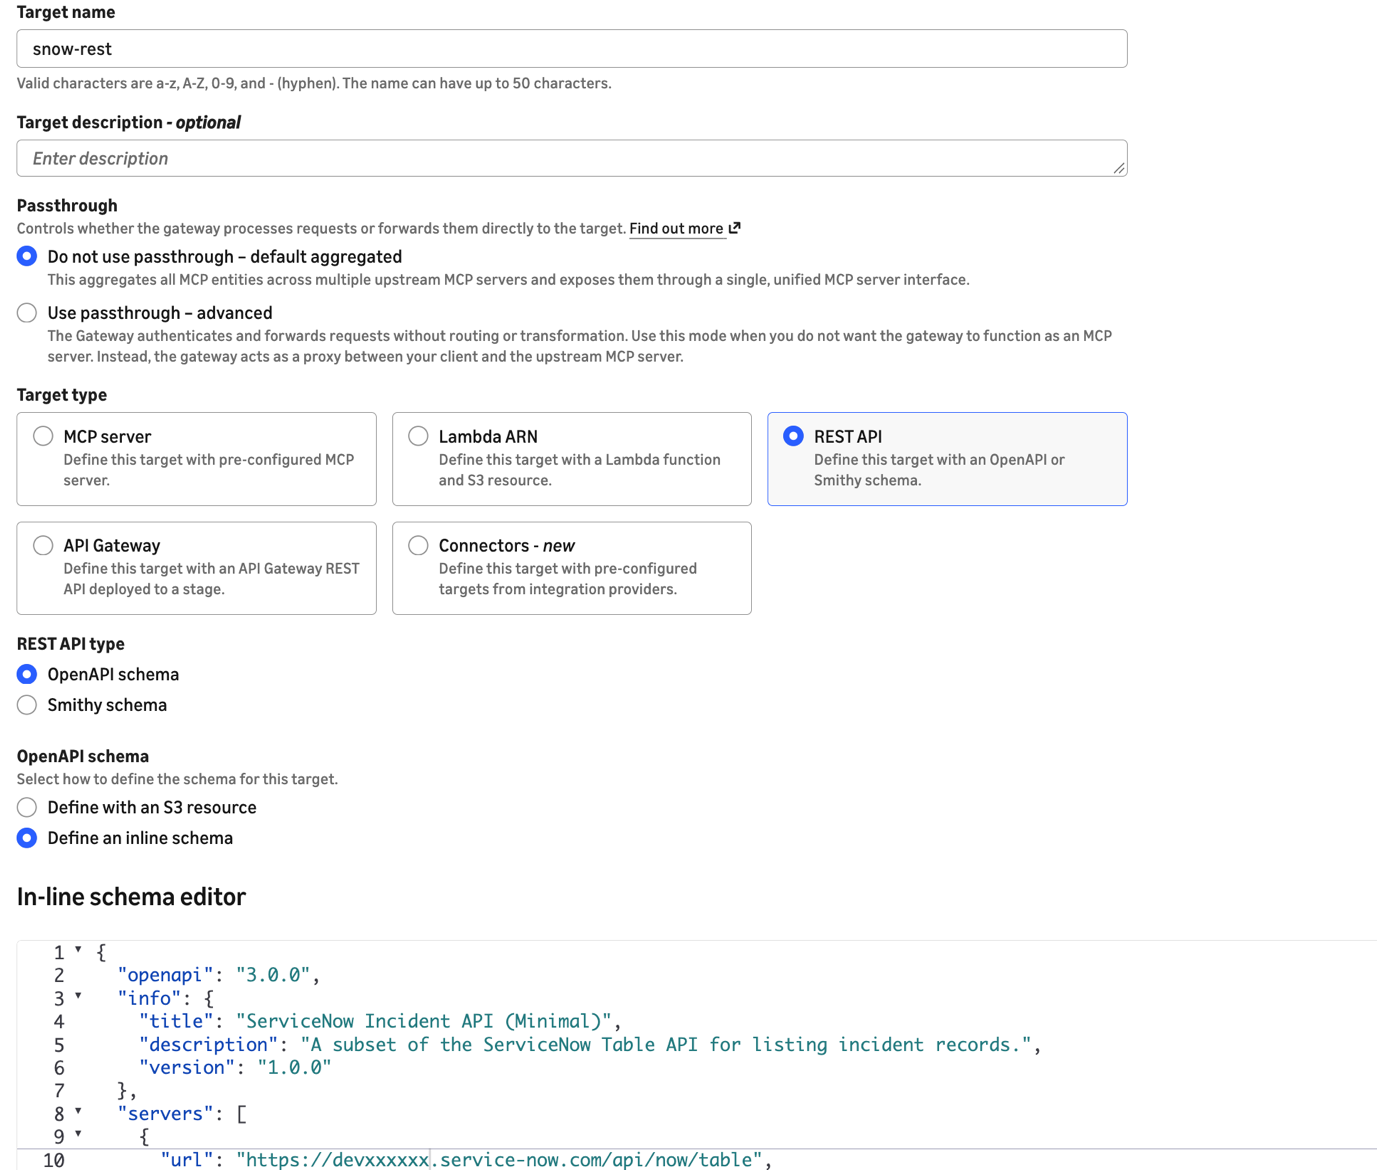
圖 15:使用 ServiceNow OpenAPI 結構描述設定 REST API 目標
在目標的 輸出驗證設定中,選擇 OAuth 作為輸出身分識別提供者,並選擇你在步驟 1 建立的輸出驗證設定。
現在展開 其他設定部分,並選擇 權杖交換授予。設定以下項目:
範圍: api://5d4a7a11-xxxx-xxxx-xxxx-xxxxxxxxxxxx/user_impersonation
這是你在 Entra 中為 ServiceNow API 連接器應用程式註冊公開的範圍。
自訂參數(鍵值組): requested_token_use:on_behalf_of
此參數至關重要。若未設定,Entra 不會執行 OBO 交換,呼叫 ServiceNow 時會因驗證錯誤而失敗。
最終設定如下方螢幕截圖所示。
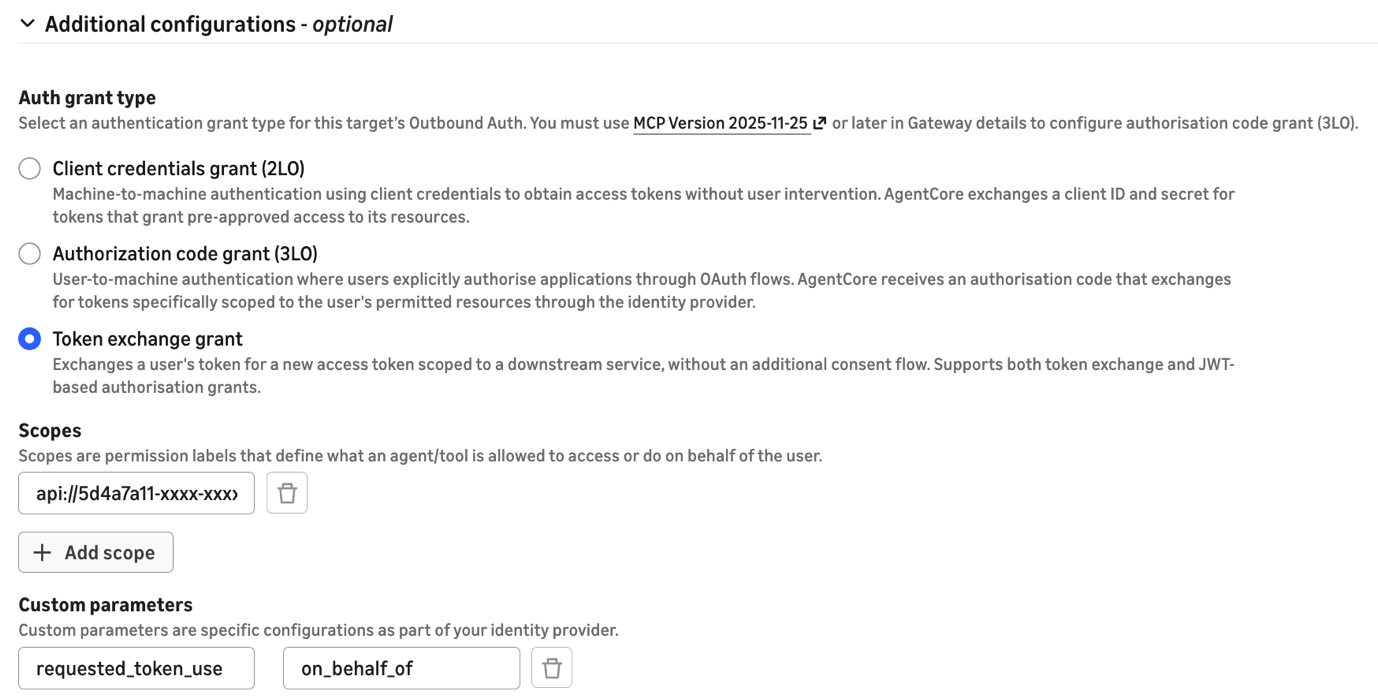
圖 16:AgentCore Gateway 目標上的權杖交換授予設定
第 4 步:儲存並測試
儲存目標設定。AgentCore Gateway 現在會自動將傳入權杖換成有效的 ServiceNow 權杖,並保留用戶身分,無需編寫自訂程式碼。
當 Agent 呼叫閘道時,以下流程會透明地進行:
- 閘道接收 Agent 的 JWT(
audience:Agent 用戶端 ID)。 - 閘道使用 OBO 授權類型,將權杖傳送至 Entra 的權杖端點。
- Entra 會發出新的權杖(
audience:ServiceNow API 連接器用戶端 ID),其中包含原用戶的聲明。 - 閘道會使用交換後的權杖,將請求轉送至 ServiceNow。
- ServiceNow 會根據權杖識別用戶,並套用其權限。
以下程式碼片段展示了精簡的聊天 Agent,透過 MCP 伺服器與 ServiceNow 互動。
import sys
import strands
from strands.models import BedrockModel
from strands.tools.mcp import MCPClient
from mcp.client.streamable_http import streamablehttp_client

token = sys.argv[1] if len(sys.argv) > 1 else sys.exit("Usage: python snow_agent.py <TOKEN>")
MCP_URL = "<GATEWAY_URL>"
mcp_client = MCPClient(lambda: streamablehttp_client(url=MCP_URL, headers={"Authorization": f"Bearer {token}"}))
agent = strands.Agent(
    model=BedrockModel(model_id="global.anthropic.claude-sonnet-4-6", streaming=False),
    system_prompt=(
        "You have a tool called 'target-snow___getIncidents'. "
        "When asked about incidents, call it immediately with no parameters. "
        "Never ask the user for credentials or instance details --- the tool is pre-configured."
    ),
    tools=[mcp_client],
)

while (user_input := input("\nYou: ")).lower() not in ("quit", "exit", "q"):
    print(f"\nAgent: {agent(user_input)}")
疑難排解
如果收到來自 ServiceNow 的驗證錯誤,請確認:
- 交換後的權杖中的
preferred_username聲明,對應至 ServiceNow 中有效的用戶電郵地址。 - ServiceNow 傳入整合的驗證範圍,允許存取 Agent 所呼叫的 API 端點。
- Agent 應用程式在 Entra 中,已獲授予 ServiceNow API 連接器應用程式的 API 權限。
清理資源
為避免持續產生費用,請刪除以下為測試而建立的資源:
- AgentCore Gateway 及其目標。
- 出站驗證設定。
- Entra 應用程式註冊(如果是專為本教學建立)。
- ServiceNow 傳入整合及 OIDC 提供者設定。
總結
AgentCore Gateway 原生支援 OBO,無需再使用自訂 AWS Lambda 攔截器進行權杖交換。您可直接在閘道目標上設定權杖交換,閘道便會在每個請求中透明地處理交換。此方法可在 Agent 至 API 的連接鏈中保留用戶身分、支援 ServiceNow 的用戶層級存取控制,並免除需要另行維護的自訂程式碼。
如要開始使用 AgentCore Gateway,請參閲 Amazon Bedrock AgentCore 説明文件。如要進一步瞭解 Microsoft Entra 的 OBO 流程,請參閲 Microsoft 身分識別平台説明文件。
作者簡介

Greg Biegel
Greg 是 AWS 資深解決方案架構師,常駐西澳洲。他熱衷於協助客戶運用數據和 AI 實現有價值的業務成果,最近亦就此主題出版了《Digital Twins in Action》一書。

Jose Guzman
Jose 是 AWS 資深合作夥伴解決方案架構師,負責服務北美的銀行業客戶。他專長於遷移、現代化及 Microsoft 技術,包括 Azure 和 Microsoft 365。Jose 熱衷於運用科技解決銀行業複雜的業務挑戰。工作以外,他喜歡遠足及與家人共度美好時光。

Arnab Chakraborty
Arnab 是 AWS 資深解決方案架構師,常駐俄亥俄州辛辛那提。他熱衷於企業 & 解決方案架構、數據分析、無伺服器技術及機器學習。閒暇時,他喜歡看電影、旅遊節目和體育賽事。

Hasan Mehdi
Hasan 是 AWS 解決方案架構師,協助金融服務機構在 AWS 上遷移、實現現代化及建構 Agentic AI 方案。他專注於應用程式現代化、容器式架構及多智能體系統設計。
來源:AWS Machine Learning Blog · aws.amazon.com