Amazon Bedrock AgentCore Gateway 如何設定 ServiceNow 的 OBO token exchange
ServiceNow on-behalf-of token exchange with Bedrock AgentCore Gateway
AWS 示範如何設定 Amazon Bedrock AgentCore Gateway,透過 Microsoft Entra ID 的 OBO token exchange,讓 AI agent 呼叫 ServiceNow REST API 時保留原用戶身份。
文章依次交代 Microsoft Entra ID、ServiceNow 與 AgentCore Gateway 的設定,呈現 OBO token 交換如何保留用戶身份並套用 ServiceNow 權限。
AI agents that interact with enterprise APIs on behalf of users need to maintain user identity throughout the request chain. Without identity propagation, API calls arrive at downstream services as the application itself rather than the user who initiated the action. This breaks audit trails, bypasses user-level access controls, and violates the principle of least privilege.
Amazon Bedrock AgentCore is a platform to build, connect, and optimize agents at scale, with any framework or model. This post shows how to configure AgentCore Gateway, a capability of Amazon Bedrock AgentCore, for an on-behalf-of (OBO) token exchange with Microsoft Entra ID. An AI agent can then call the ServiceNow REST API while preserving the calling user’s identity. You configure the token exchange on the gateway target, and AgentCore Gateway performs the exchange on each request. The pattern can be applied to other REST APIs protected by OAuth.
In production, you can additionally pair identity propagation with Amazon Bedrock Guardrails to filter harmful content and validate the agent’s inputs and outputs.
Solution overview
The architecture involves three key components connected through AgentCore Gateway:
- An AI agent application, protected by Microsoft Entra ID through an OAuth application registration.
- A Model Context Protocol (MCP) server, implemented using AgentCore Gateway, sitting between the agent and ServiceNow.
- The ServiceNow REST API, configured with an inbound OAuth integration tied to Microsoft Entra ID.
The following figure shows the end-to-end solution architecture, including components within AWS, Microsoft Entra ID, and ServiceNow.
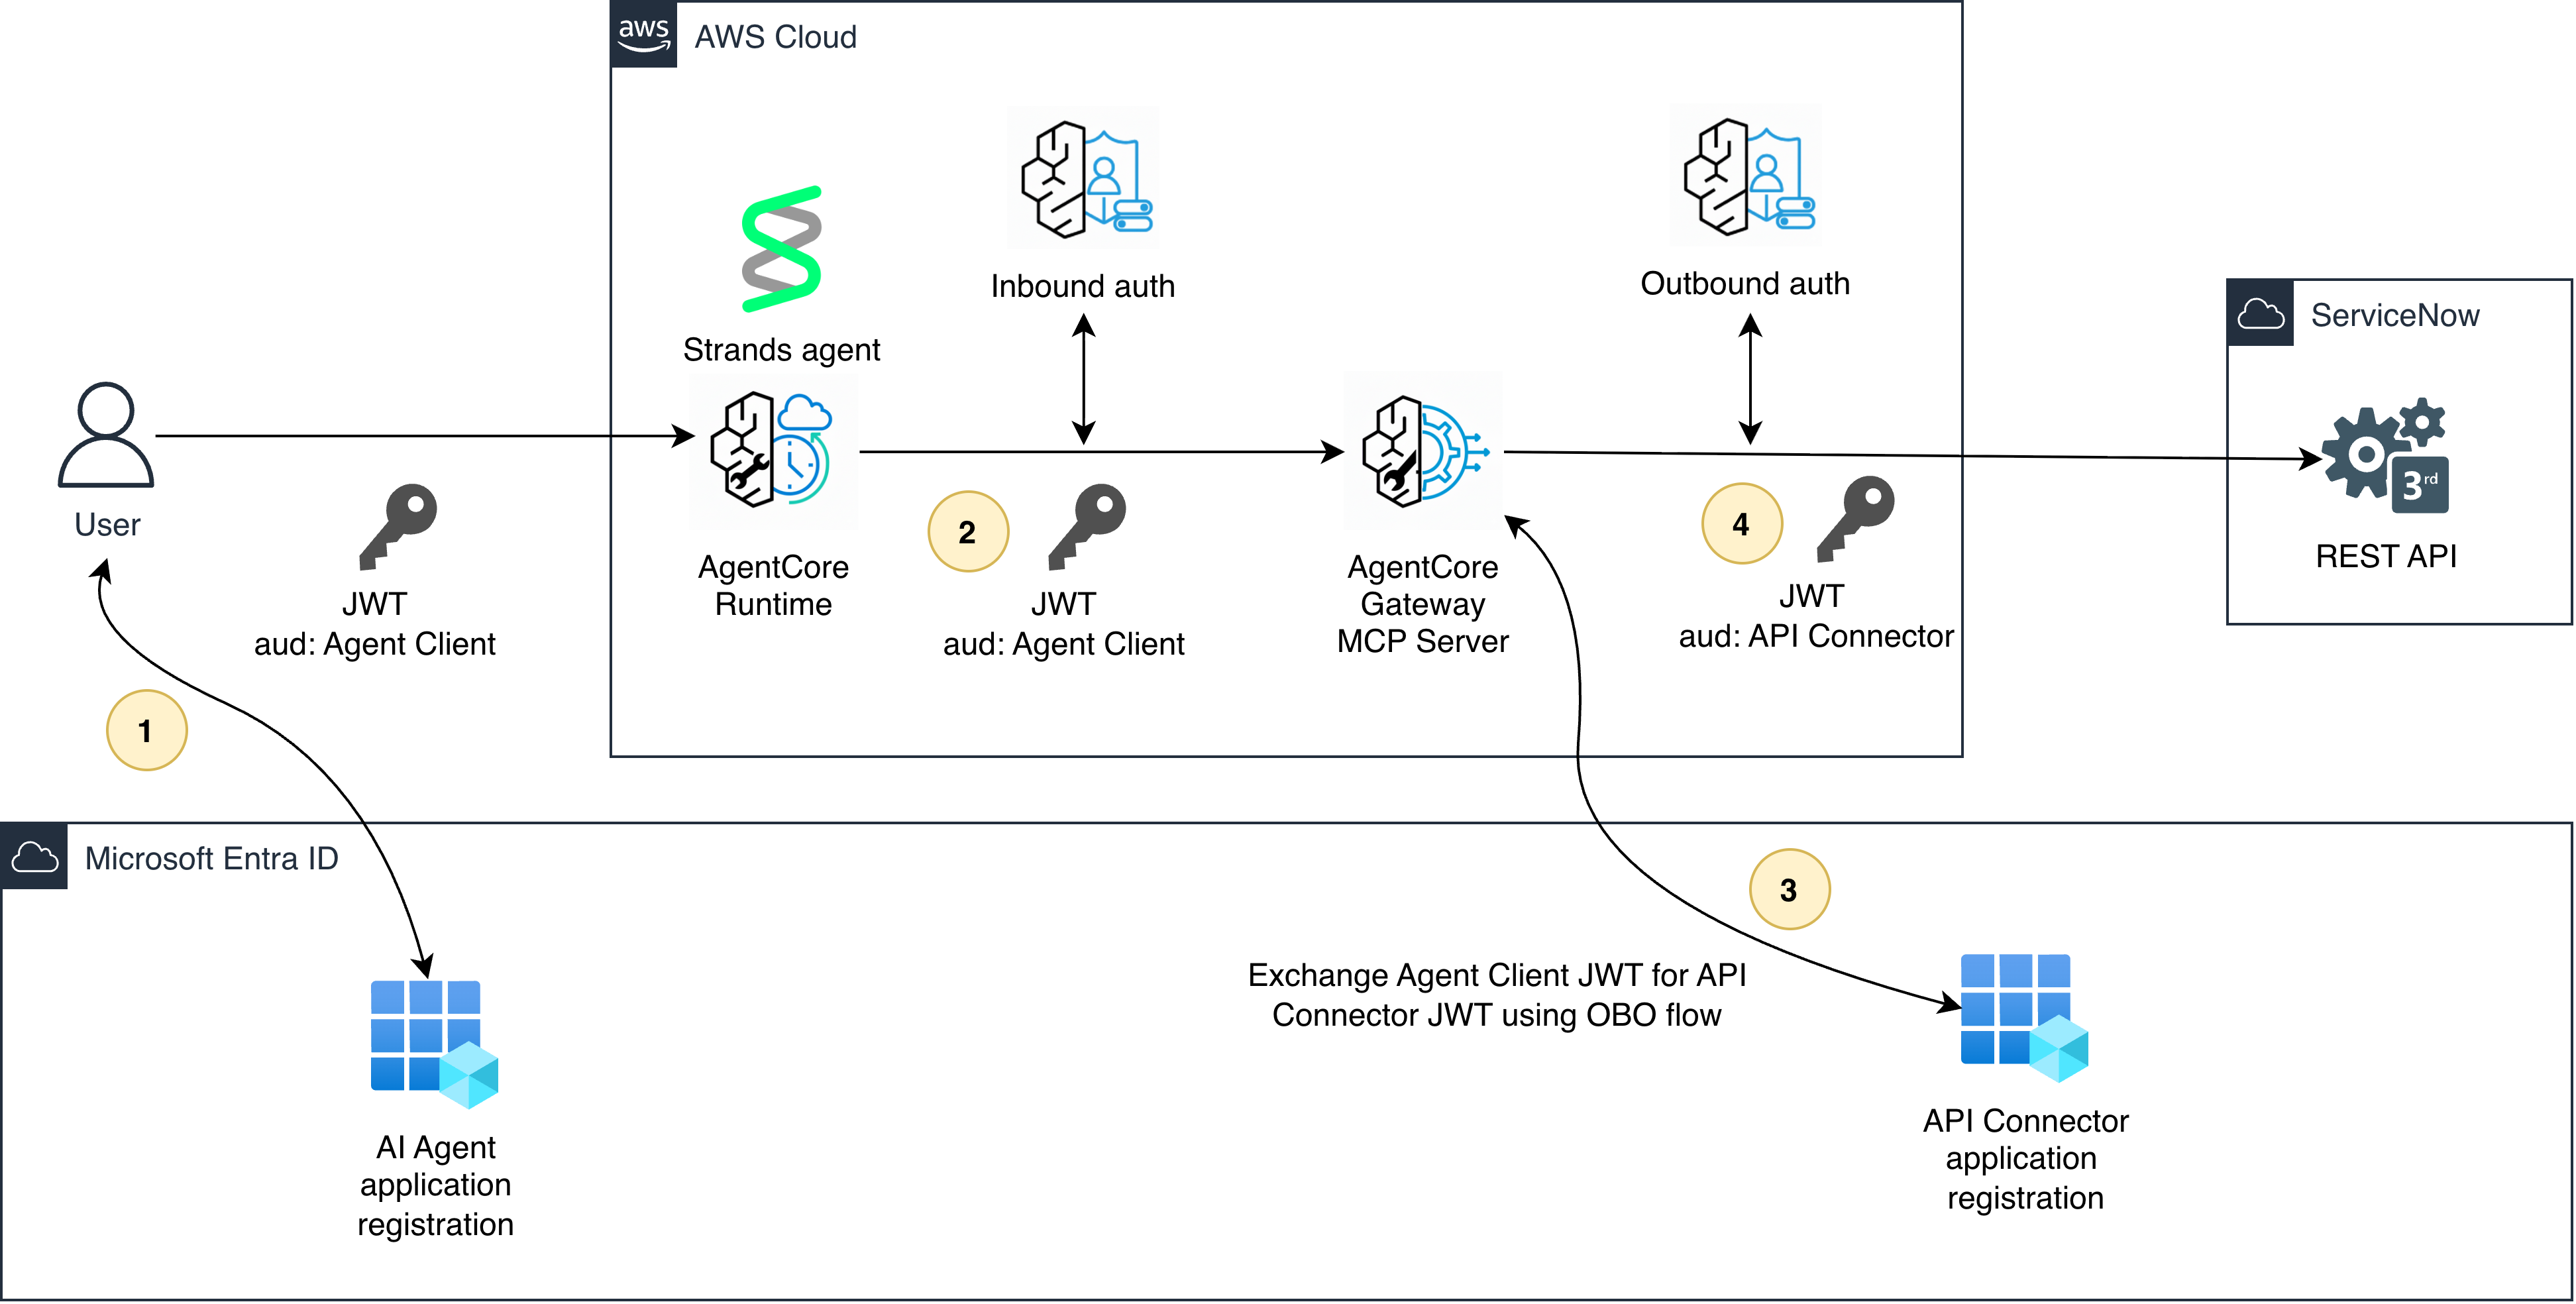
Figure 1: Solution architecture across AWS, Microsoft Entra ID, and ServiceNow
As shown in Figure 1, the user acquires a JSON Web Token (JWT) to invoke the agent 1. The agent authenticates to the gateway with a JWT token scoped to the agent’s own application registration 2. The gateway then exchanges that token, using the OBO flow, for a new token scoped to the ServiceNow API connector, with the original user’s identity preserved 3. ServiceNow receives a valid token whose preferred_username claim maps to an existing ServiceNow user and applies that user’s permissions to the API call 4.
How OBO token exchange works in this context
When the agent calls the gateway, it presents a JWT with an audience claim matching the agent’s client ID (for example, 3ff88e17-XXXX-XXXX-XXXX-XXXXXXXXXXXX). ServiceNow, however, expects a token with an audience claim matching its own API connector client ID (5d4a7a11-XXXX-XXXX-XXXX-XXXXXXXXXXXX).
The OBO flow bridges this gap. AgentCore Gateway sends the inbound token to the Entra token endpoint along with the agent application’s client credentials, the target scope, and a parameter requested_token_use: on_behalf_of. Entra validates that the calling user consented to the delegation, then issues a new token for the ServiceNow API with the original user’s claims intact.
Prerequisites
Before you begin, you need the following:
- An AWS account with access to AgentCore Gateway.
- A Microsoft Entra ID tenant with permissions to create application registrations. Your account needs at least the Application Developer role to register applications.
- A ServiceNow instance with administrative access to configure inbound OAuth integrations. You can create a ServiceNow personal developer instance (PDI) at the ServiceNow personal developer instance signup page https://developer.servicenow.com/.
- Two Entra application registrations: one representing the AI agent, and one representing the ServiceNow API connector.
Configuring Microsoft Entra ID
Start by creating an application registration to represent the ServiceNow API connector. The following screenshot shows the application registration page for the ServiceNow API Connector in Microsoft Entra ID.
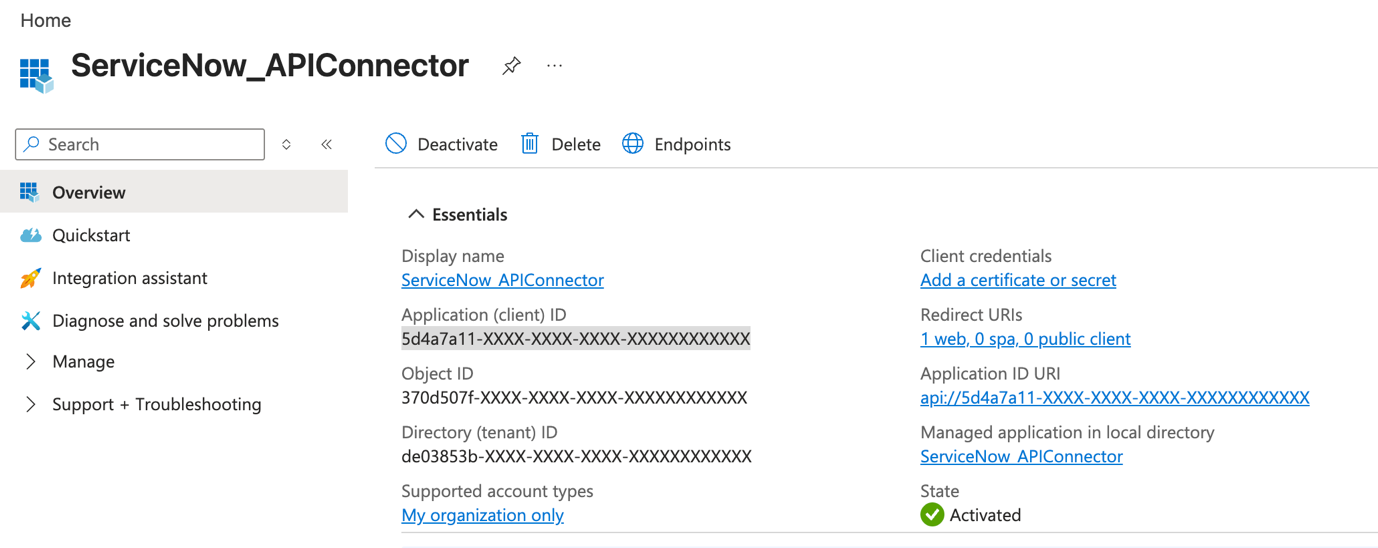
Figure 2: Application registration for the ServiceNow API connector in Microsoft Entra ID
After creating, in the Overview page note the Application (client) ID.
In the navigation menu expand Manage and select Expose an API and add a scope named user_impersonation using the default Application ID URI. This scope is what the OBO flow requests when exchanging tokens. The following screenshot shows how to expose an API in Microsoft Entra ID.
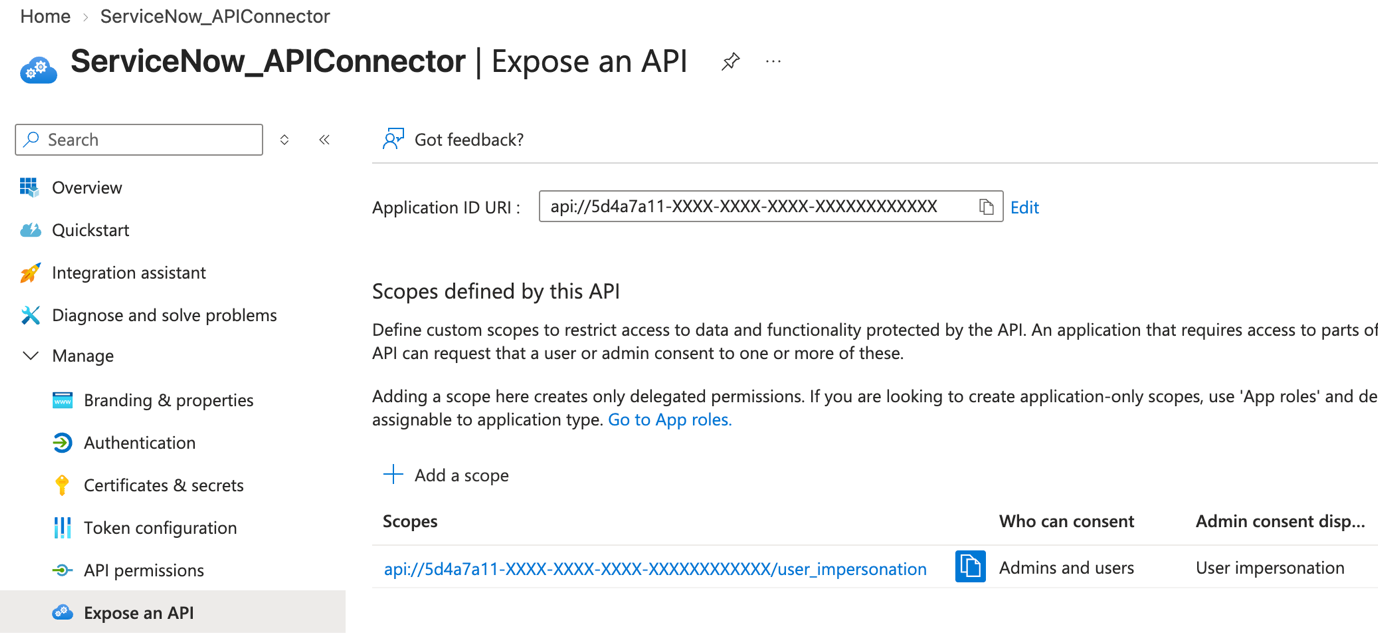
Figure 3: Exposing the user_impersonation scope in Microsoft Entra ID
Next, create an application registration for the AI agent. The following screenshot shows the application registration page in Microsoft Entra ID for the ServiceNow Agent application.
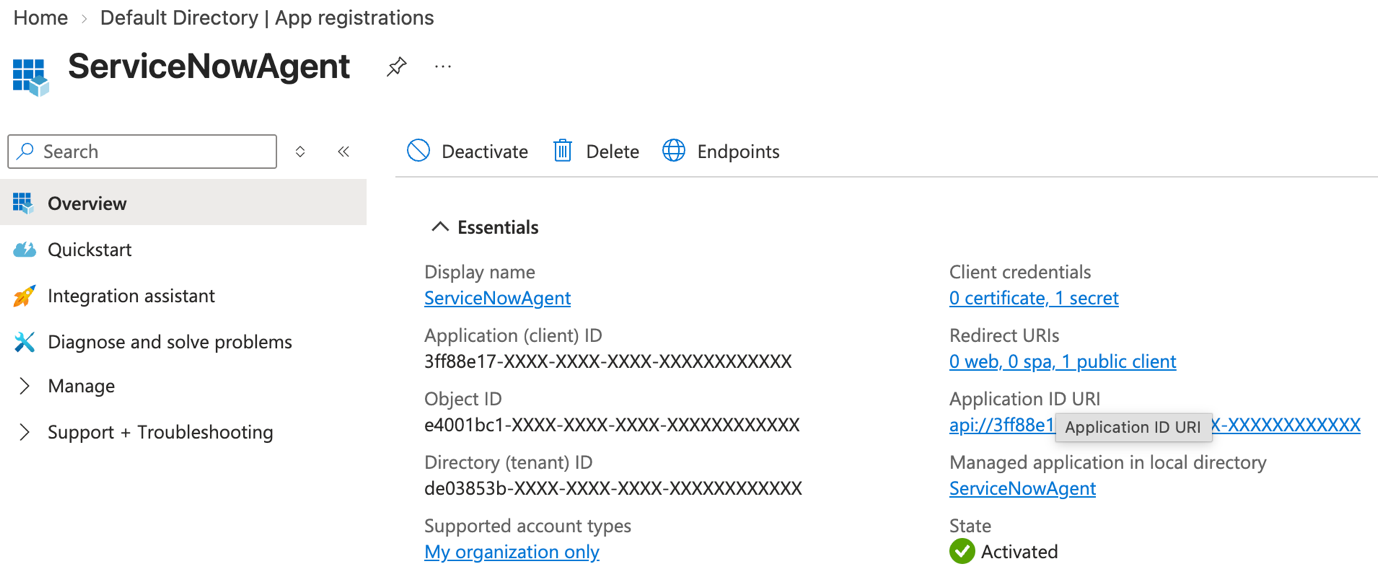
Figure 4: Application registration for the ServiceNow Agent in Microsoft Entra ID
Note the Application (client) ID for the ServiceNowAgent.
Create a client secret on this registration. The gateway needs these credentials to perform the OBO exchange. The following screenshot shows how you can create a client secret on the ServiceNow Agent application registration in Microsoft Entra ID.
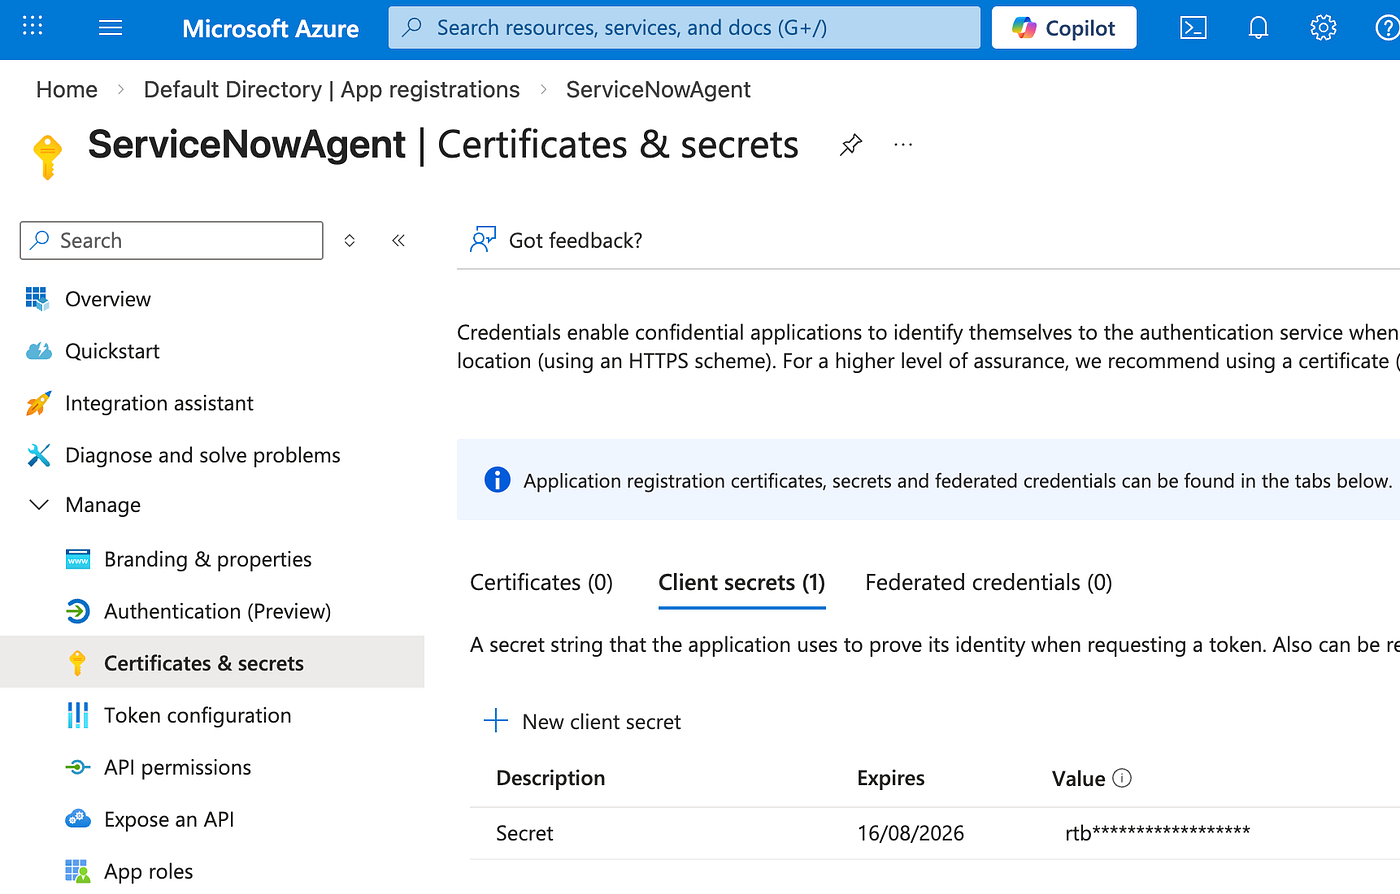
Figure 5: Creating a client secret on the ServiceNow Agent application registration
Then configure the agent application to have API permissions to call the ServiceNow API connector application. The following screenshot shows the API permissions that you need to configure on the ServiceNow Agent application registration in Microsoft Entra ID.
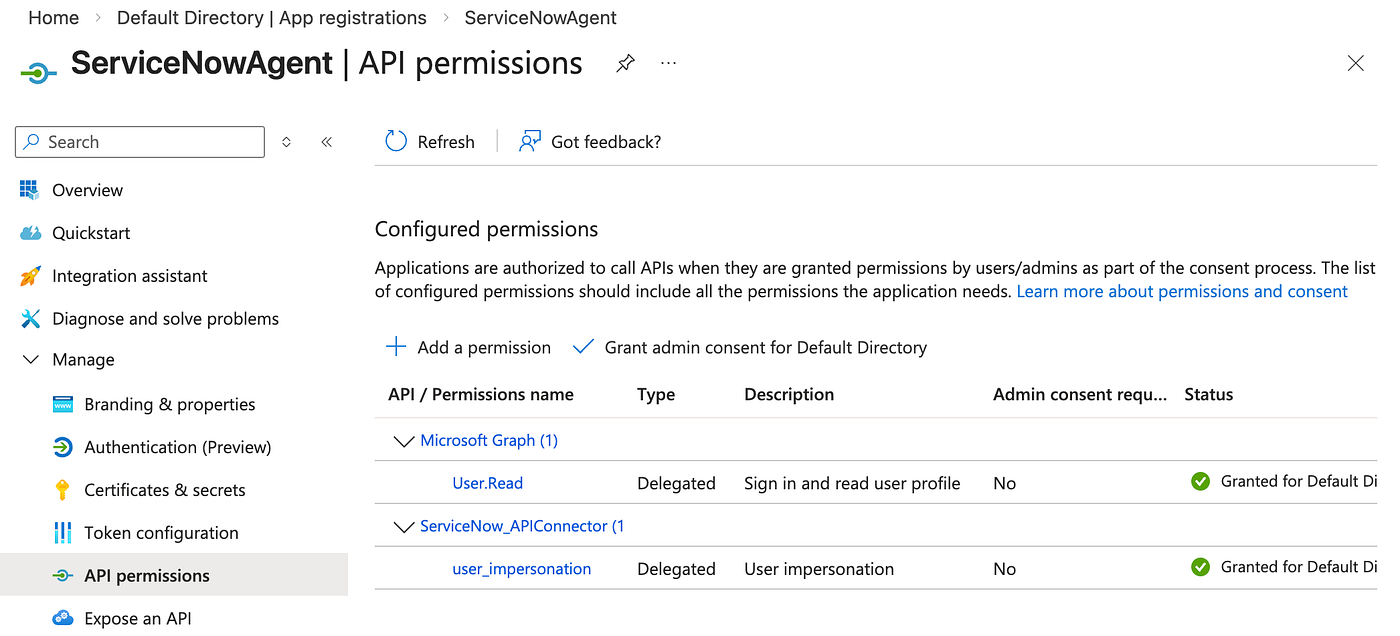
Figure 6: API permission configuration in Microsoft Entra ID
No changes to the Entra configuration are needed beyond what you would set up for any standard OBO integration between two applications.
Configuring ServiceNow
In the ServiceNow administrative console, navigate to System OAuth > Inbound Integrations and create a new inbound integration (Third party ID token issued by OIDC supporting identity provider). Specify the client ID from the ServiceNow API connector application registration you created in Entra. The following screenshot shows the configuration of the inbound integration in ServiceNow.
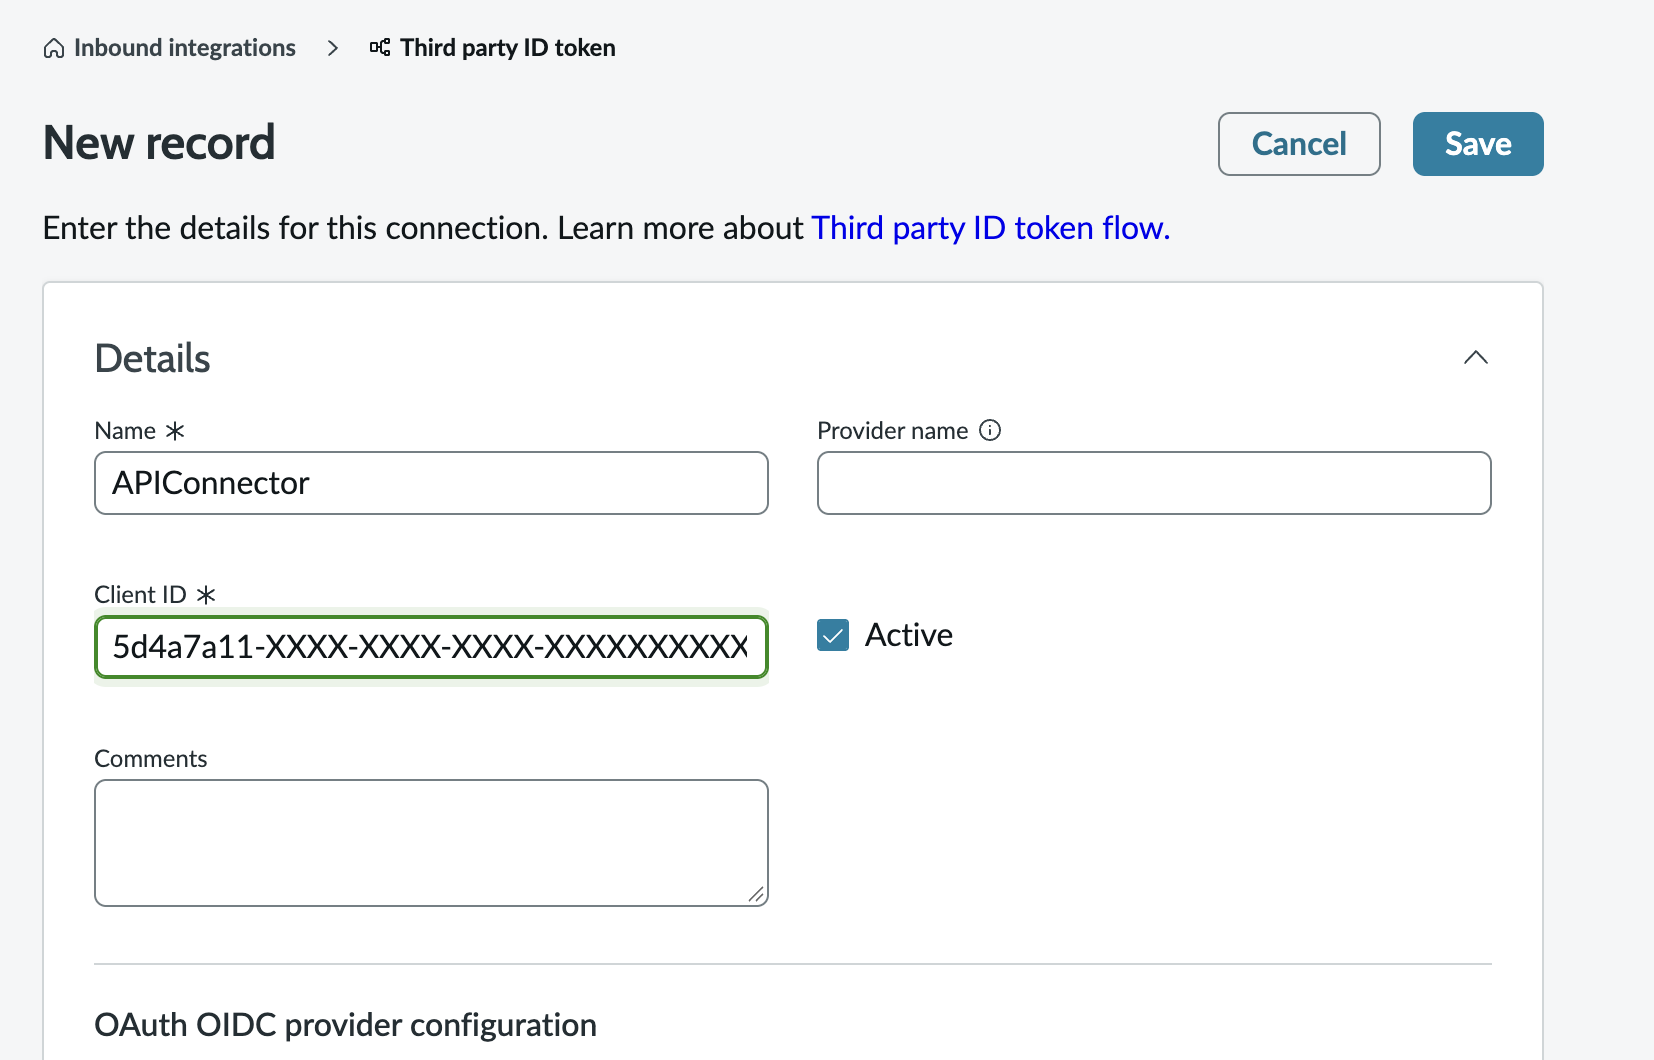
Figure 7: Configuring the inbound integration in ServiceNow
In the same screen, create a new OpenID Connect (OIDC) provider configuration and enter the OIDC metadata URL for your Entra tenant. Map the user claim to the appropriate user field. For example, if your Entra tenant places the user’s email in the preferred_username claim, map that to the Email field in ServiceNow. Clear JTI verification if your Entra tenant doesn’t include it in tokens. Entra uses an internal claim named uti on tokens it issues, which is equivalent to JTI. Consider mapping this uti claim to a jti claim to provide additional replay protection and denylisting. The following screenshot shows how to configure the OIDC provider in ServiceNow.
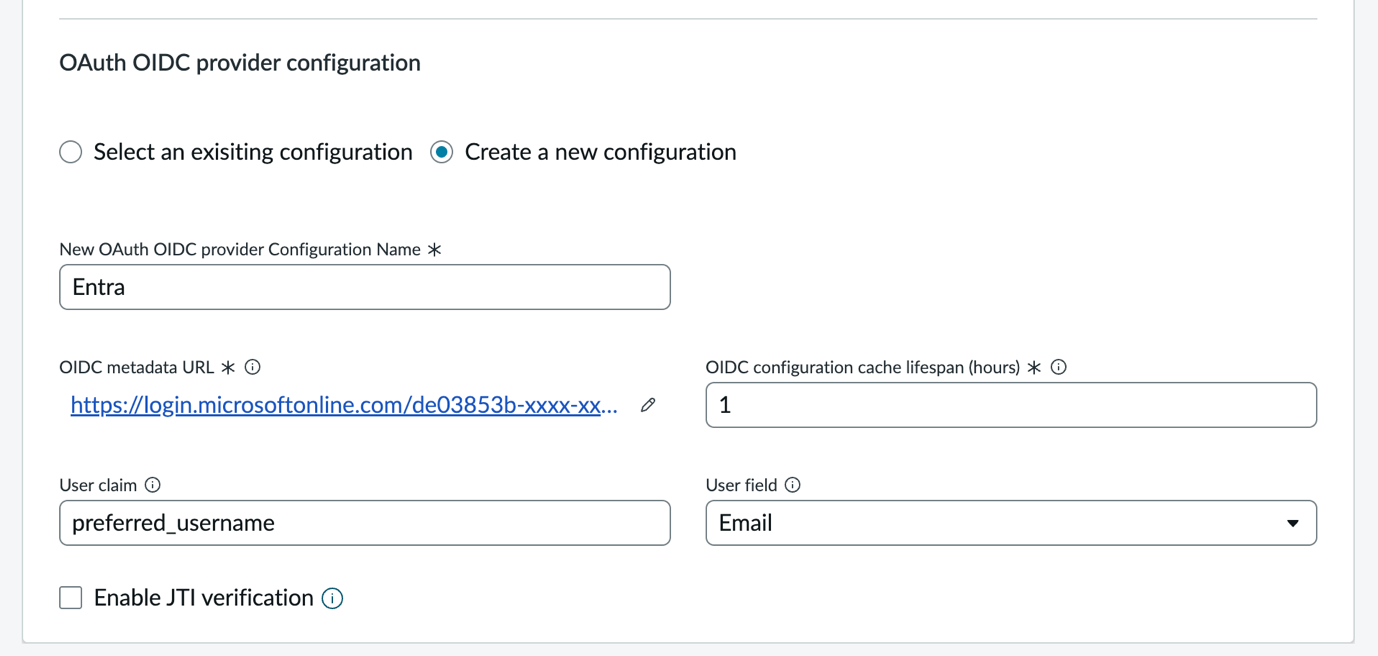
Figure 8: Configuring the OAuth OIDC provider in ServiceNow
Finally, in the same screen, create an auth scope for the integration (for example, APIConnector). The following screenshot shows how to create a new auth scope in ServiceNow.
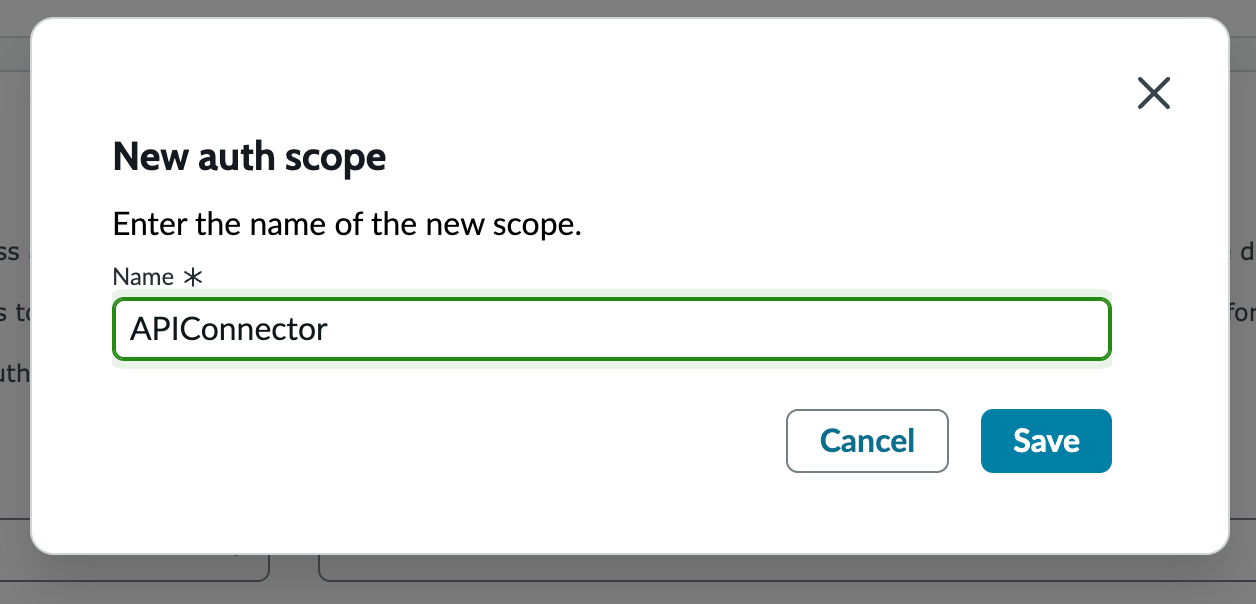
Figure 9: Creating a new auth scope in ServiceNow
Limit the auth scope to the Table API, or whichever ServiceNow APIs your agent needs to access, as shown in the following screenshot.
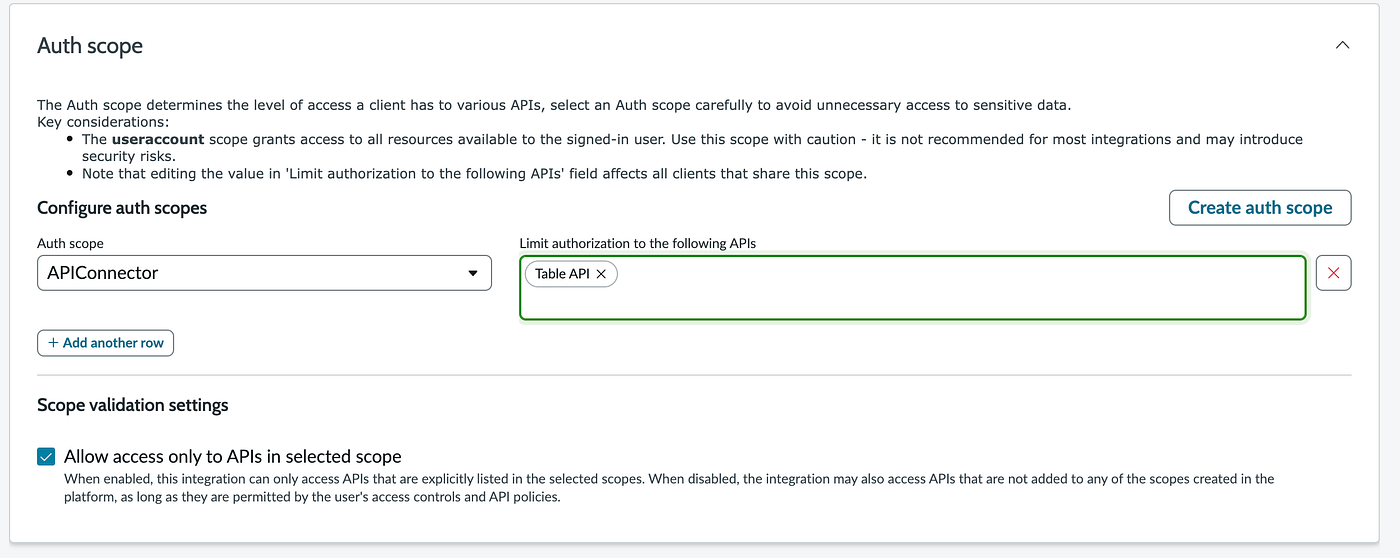
Figure 10: Limiting the auth scope to the Table API in ServiceNow
After this configuration is complete, ServiceNow accepts authorization tokens with an audience of your API connector’s client ID and resolves the calling user from the preferred_username claim.
Configuring AgentCore Gateway
With Entra and ServiceNow configured, you can now set up AgentCore Gateway to handle the OBO exchange natively.
Step 1: Create an outbound auth configuration
Create a new outbound auth configuration (choose Build > Identity > Add Outbound Auth > Add OAuth client) in AgentCore and select Customized provider. Enter the client ID and client secret from your agent application registration, along with the Entra discovery URL as shown in the following screenshot.
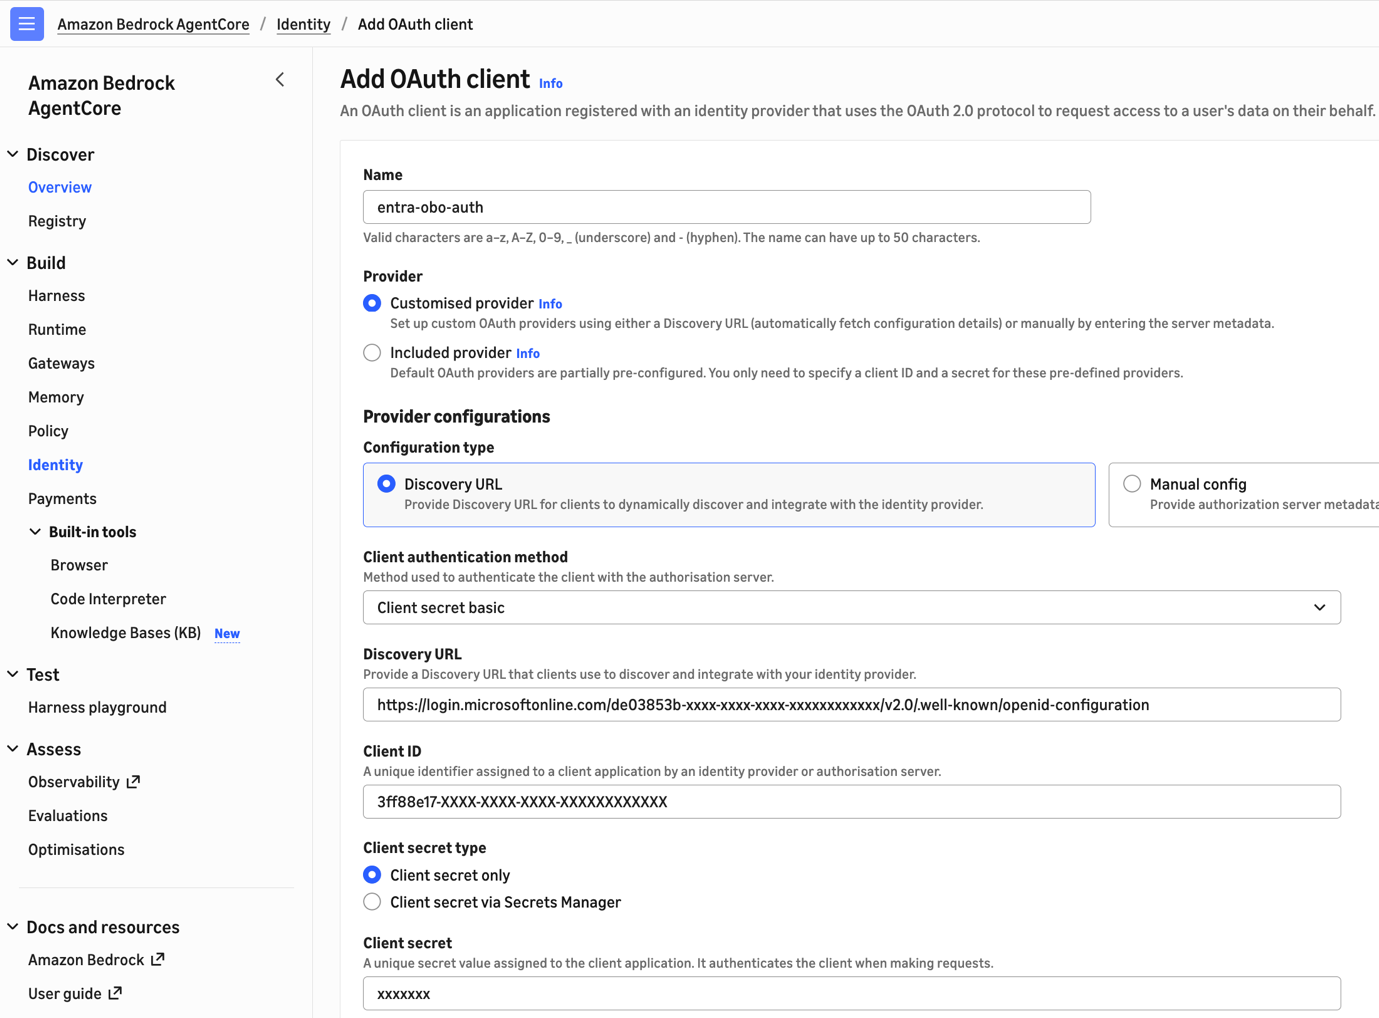
Figure 11: Adding an OAuth client in AgentCore Gateway
Expand Additional configurations and select JWT authorization grant as shown in the following screenshot. This tells the gateway to use a JWT-based grant type for token exchange.
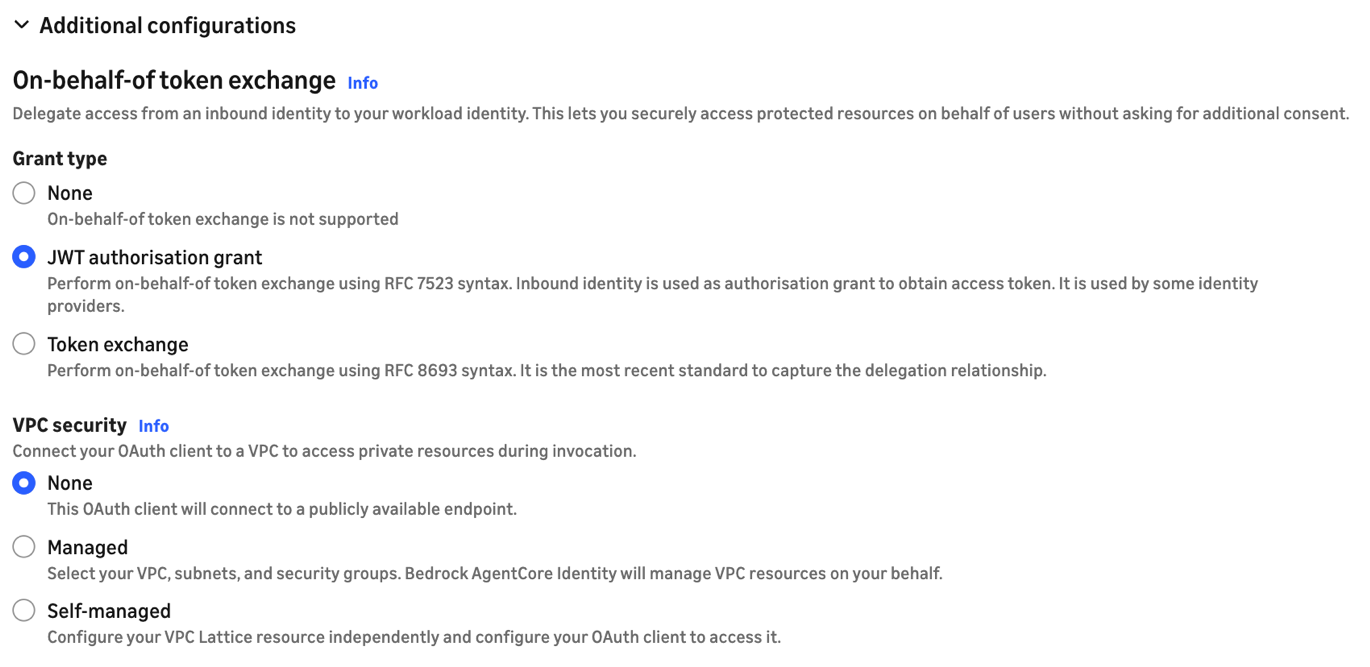
Figure 12: Configuring the JWT authorization grant
Step 2: Create the gateway with MCP version 2025-11-25
Create a new AgentCore Gateway (Build > Gateways > Create gateway). When defining the gateway details, expand Additional configurations — optional and select MCP version 2025-11-25 as shown in the following screenshot. This version is required for native OBO support. You can’t turn on native OBO for gateways created with earlier MCP versions.

Figure 13: Selecting MCP version 2025-11-25
Configure the inbound identity using your agent’s application registration (select Use existing identity provider configurations), as you would for any gateway that accepts Entra-authenticated requests.
Under JWT Authorization Configuration add the Application ID we documented earlier for the ServiceNowAgent as shown in the following screenshot.
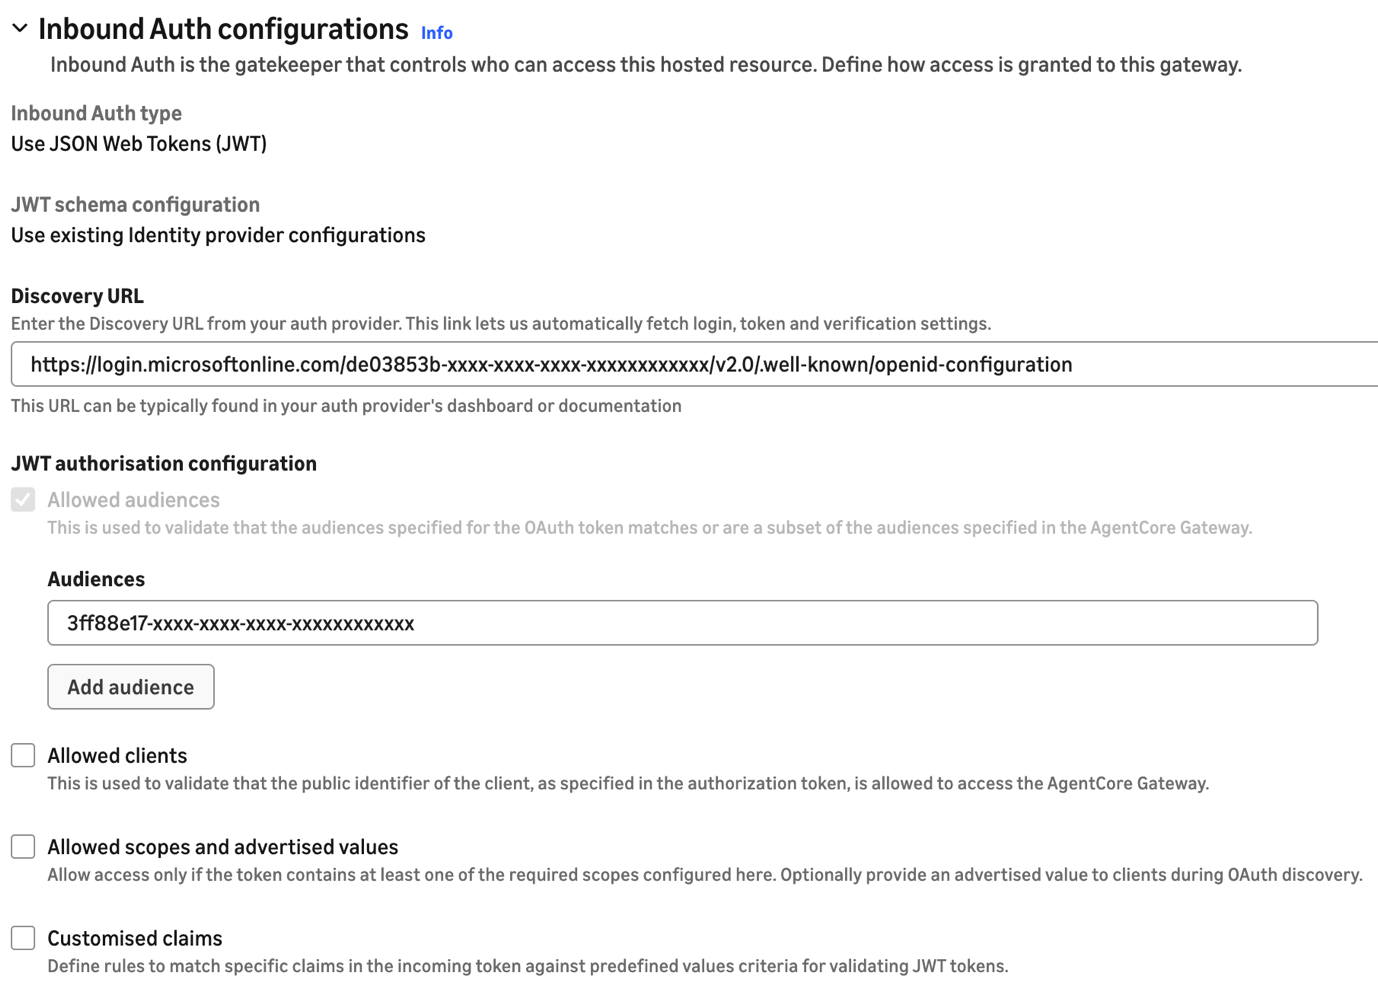
Figure 14: Configuring inbound authorization in AgentCore Gateway
Step 3: Add a target with token exchange
Add a target to the gateway pointing to your ServiceNow REST endpoint. Define the schema inline. For example, to expose a tool called ListIncidents that calls the ServiceNow Table API, you can use the following OpenAPI specification (replace the server URL with that for your PDI).
{
  "openapi": "3.0.0",
  "info": {
    "title": "ServiceNow Incident API (Minimal)",
    "description": "A subset of the ServiceNow Table API for listing incident records.",
    "version": "1.0.0"
  },
  "servers": [
    {
      "url": "https://devxxx.service-now.com/api/now/table",
      "variables": {
        "instance": {
          "default": "devxxx",
          "description": "Your ServiceNow instance name."
        }
      }
    }
  ],
  "paths": {
    "/incident": {
      "get": {
        "operationId": "getIncidents",
        "summary": "List incidents",
        "description": "Retrieves a list of incident records from the ServiceNow instance.",
        "parameters": [
          {
            "name": "sysparm_limit",
            "in": "query",
            "description": "Maximum number of records to return.",
            "schema": {
              "type": "integer",
              "default": 10
            }
          },
          {
            "name": "sysparm_query",
            "in": "query",
            "description": "An encoded query string to filter results (e.g., active=true).",
            "schema": {
              "type": "string"
            }
          },
          {
            "name": "sysparm_fields",
            "in": "query",
            "description": "A comma-separated list of fields to return.",
            "schema": {
              "type": "string"
            }
          }
        ],
        "responses": {
          "200": {
            "description": "A successful response containing an array of incidents.",
            "content": {
              "application/json": {
                "schema": {
                  "type": "object",
                  "properties": {
                    "result": {
                      "type": "array",
                      "items": {
                        "$ref": "#/components/schemas/Incident"
                      }
                    }
                  }
                }
              }
            }
          },
          "401": {
            "description": "Unauthorized - Invalid credentials."
          }
        },
        "security": [
          {
            "bearerAuth": []
          }
        ]
      }
    }
  },
  "components": {
    "securitySchemes": {
      "bearerAuth": {
        "type": "http",
        "scheme": "bearer",
        "bearerFormat": "JWT"
      }
    },
    "schemas": {
      "Incident": {
        "type": "object",
        "properties": {
          "sys_id": {
            "type": "string",
            "description": "Unique identifier for the incident."
          },
          "number": {
            "type": "string",
            "description": "Incident ID (e.g., INC0000001)."
          },
          "short_description": {
            "type": "string",
            "description": "A brief summary of the incident."
          },
          "severity": {
            "type": "string",
            "description": "The severity level of the incident."
          },
          "state": {
            "type": "string",
            "description": "The current state of the incident (e.g., New, In Progress, Closed)."
          },
          "sys_created_on": {
            "type": "string",
            "format": "date-time",
            "description": "The timestamp when the incident was created."
          }
        }
      }
    }
  }
}
The following screenshot shows how to configure the REST API target in AgentCore Gateway with the OpenAPI schema.
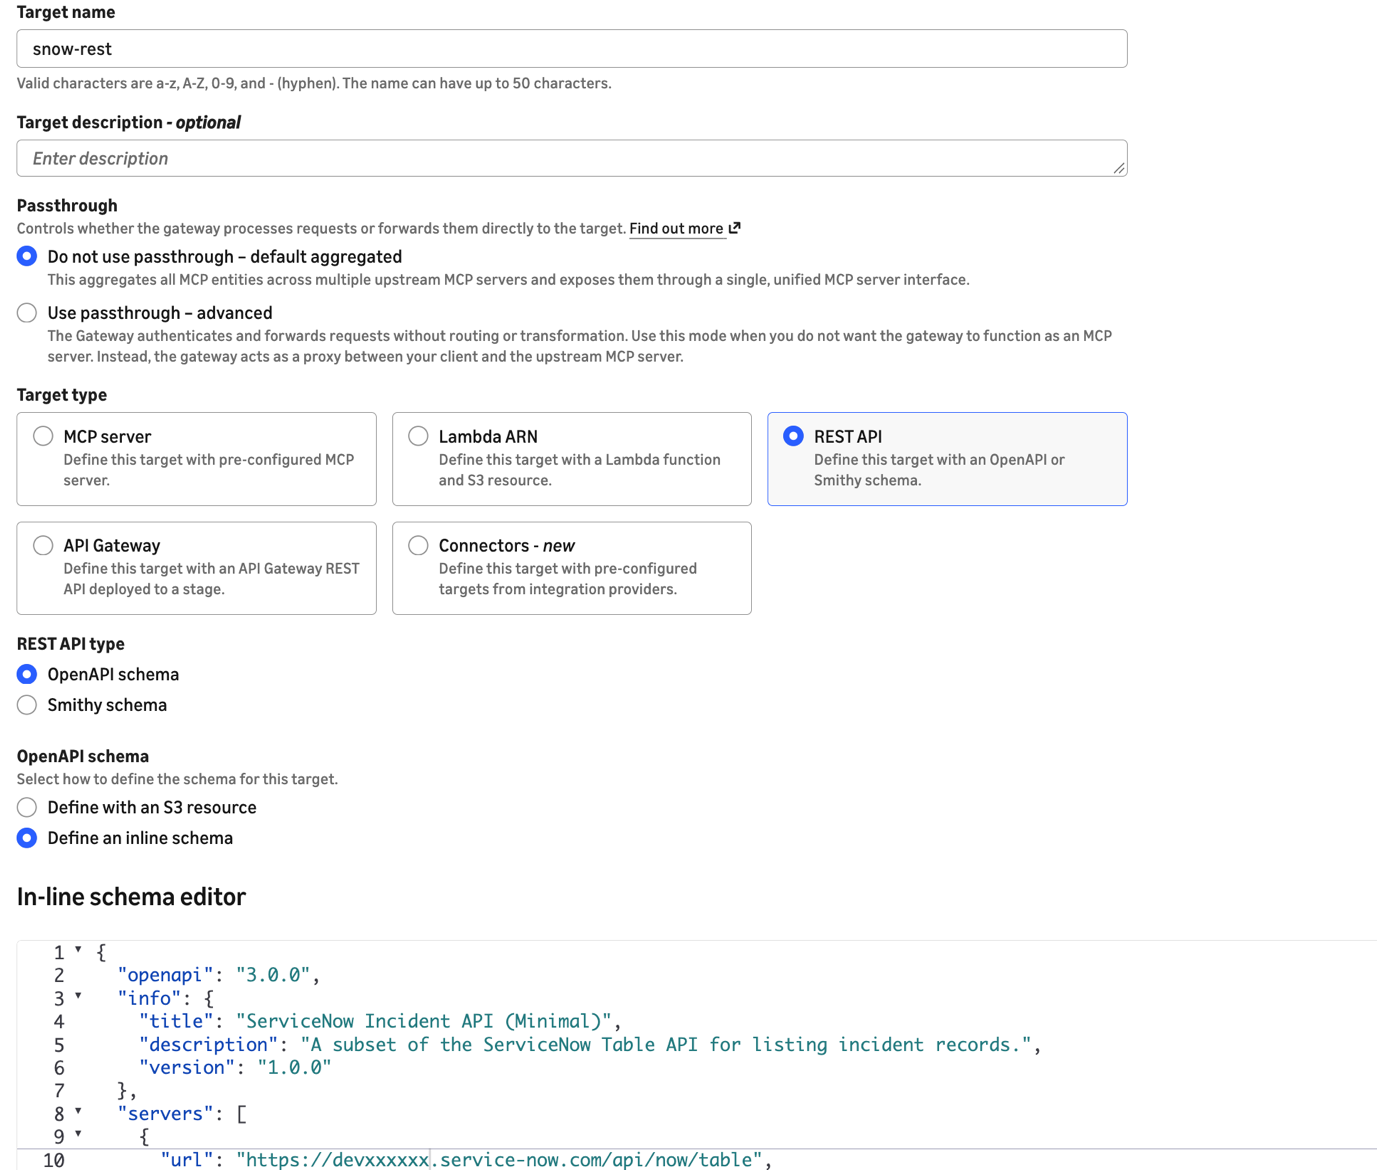
Figure 15: Configuring the REST API target with the ServiceNow OpenAPI schema
For the Outbound Auth configuration on the target, select OAuth as the outbound identity provider and choose the outbound auth configuration you created in Step 1.
Now expand the Additional configurations section and select Token exchange grant. Configure the following:
Scope: api://5d4a7a11-xxxx-xxxx-xxxx-xxxxxxxxxxxx/user_impersonation
This is the scope you exposed on the ServiceNow API connector application registration in Entra.
Custom parameter (key-value pair): requested_token_use:on_behalf_of
This parameter is critical. Without it, Entra doesn’t perform the OBO exchange and the call to ServiceNow fails with an authentication error.
The final configuration is shown in the following screenshot.
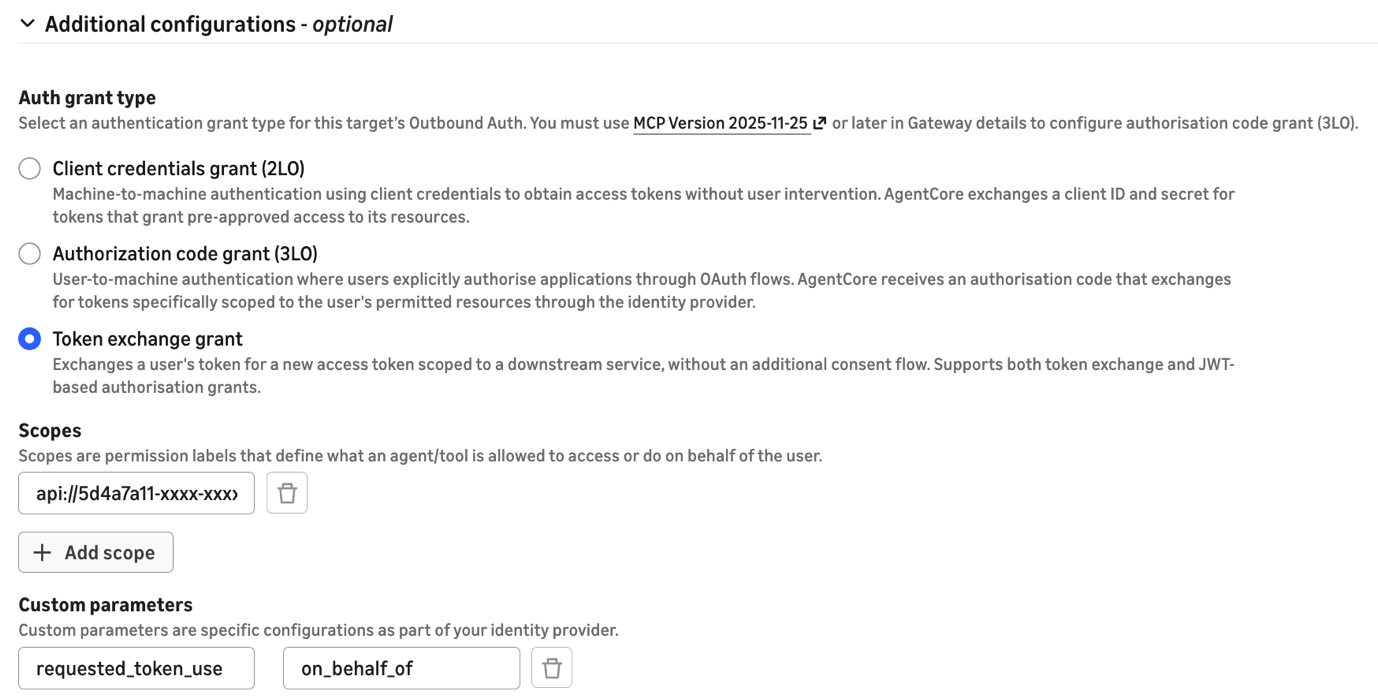
Figure 16: Token exchange grant configuration on the AgentCore Gateway target
Step 4: Save and test
Save the target configuration. AgentCore Gateway now automatically exchanges inbound tokens for valid ServiceNow tokens, preserving user identity, with no custom code.
When an agent calls the gateway, the following happens transparently:
- The gateway receives the agent’s JWT (
audience: agent client ID). - The gateway sends the token to Entra’s token endpoint with the OBO grant type.
- Entra issues a new token (
audience: ServiceNow API connector client ID) with the original user’s claims. - The gateway forwards the request to ServiceNow with the exchanged token.
- ServiceNow resolves the user from the token and applies their permissions.
The following code snippet shows a minimal chat agent that interacts with ServiceNow through the MCP server.
import sys
import strands
from strands.models import BedrockModel
from strands.tools.mcp import MCPClient
from mcp.client.streamable_http import streamablehttp_client

token = sys.argv[1] if len(sys.argv) > 1 else sys.exit("Usage: python snow_agent.py <TOKEN>")
MCP_URL = "<GATEWAY_URL>"
mcp_client = MCPClient(lambda: streamablehttp_client(url=MCP_URL, headers={"Authorization": f"Bearer {token}"}))
agent = strands.Agent(
    model=BedrockModel(model_id="global.anthropic.claude-sonnet-4-6", streaming=False),
    system_prompt=(
        "You have a tool called 'target-snow___getIncidents'. "
        "When asked about incidents, call it immediately with no parameters. "
        "Never ask the user for credentials or instance details --- the tool is pre-configured."
    ),
    tools=[mcp_client],
)

while (user_input := input("\nYou: ")).lower() not in ("quit", "exit", "q"):
    print(f"\nAgent: {agent(user_input)}")
Troubleshooting
If you receive authentication errors from ServiceNow, verify that:
- The
preferred_usernameclaim in the exchanged token maps to a valid user email in ServiceNow. - The auth scope on the ServiceNow inbound integration permits access to the API endpoints your agent is calling.
- The agent application has API permissions to the ServiceNow API connector application in Entra.
Cleaning up
To avoid ongoing charges, delete the following resources if you created them for testing:
- The AgentCore Gateway and its targets.
- The outbound auth configuration.
- The Entra application registrations (if created specifically for this walkthrough).
- The ServiceNow inbound integration and OIDC provider configuration.
Conclusion
The native OBO support in AgentCore Gateway removes the need for custom AWS Lambda interceptors to perform token exchanges. You configure the token exchange directly on the gateway target, and the gateway handles it transparently on every request. This approach maintains user identity across the agent-to-API chain, supports ServiceNow’s user-level access controls, and eliminates custom code that would need to be maintained separately.
To get started with AgentCore Gateway, see the Amazon Bedrock AgentCore documentation. For more on Microsoft Entra’s OBO flow, refer to the Microsoft identity platform documentation.
About the authors

Greg Biegel
Greg is a senior Solution Architect with AWS, based in Western Australia. He is passionate about helping customers use data and AI to achieve valuable business outcomes and recently published the book “Digital Twins in Action” on the topic.

Jose Guzman
Jose is a Senior Partner Solutions Architect with AWS, serving banking customers across North America. He specializes in migrations, modernizations, and Microsoft technologies, including Azure and Microsoft 365. Jose is passionate about leveraging technology to solve complex business challenges in the banking sector. Outside of work, he enjoys hiking and spending quality time with his family.

Arnab Chakraborty
Arnab is a Senior Solutions Architect at AWS based in Cincinnati, Ohio. He is passionate about topics in Enterprise & Solution architecture, Data analytics, Serverless, and Machine Learning. In his spare time, he enjoys watching movies, travel shows, and sports.

Hasan Mehdi
Hasan is a Solutions Architect at AWS who helps financial services organizations migrate, modernize, and build agentic AI solutions on AWS. He focuses on application modernization, container-based architectures, and multi-agent system design.
來源:AWS Machine Learning Blog · aws.amazon.com